¶ Create and Launch a Secondary Collection
After you finished creating the Membership collection, you can create more collections for your community. These are the secondary collections.
Before you start creating a secondary card collection, it is recommended to prepare a short description about the collection and some artwork for the cards. Your collection can be very simple (all cards look the same) or very complex (using many different pictures and their combinations) and a lot in between... just make sure you prepare images of the same size in PNG or JPG format, and you are using images with size less than 4 MB.
Besides, prepare a small banner (750x750px), a large banner (3840x1000px), and a Welcome image (720x168px) for the collection. The Welcome image will be used to represent the collection on social media if it is referenced.
¶ Prerequisites:
- Have a created community - or with e-mail or with crypto wallet - with a published website.
- Have a launched Membership collection.
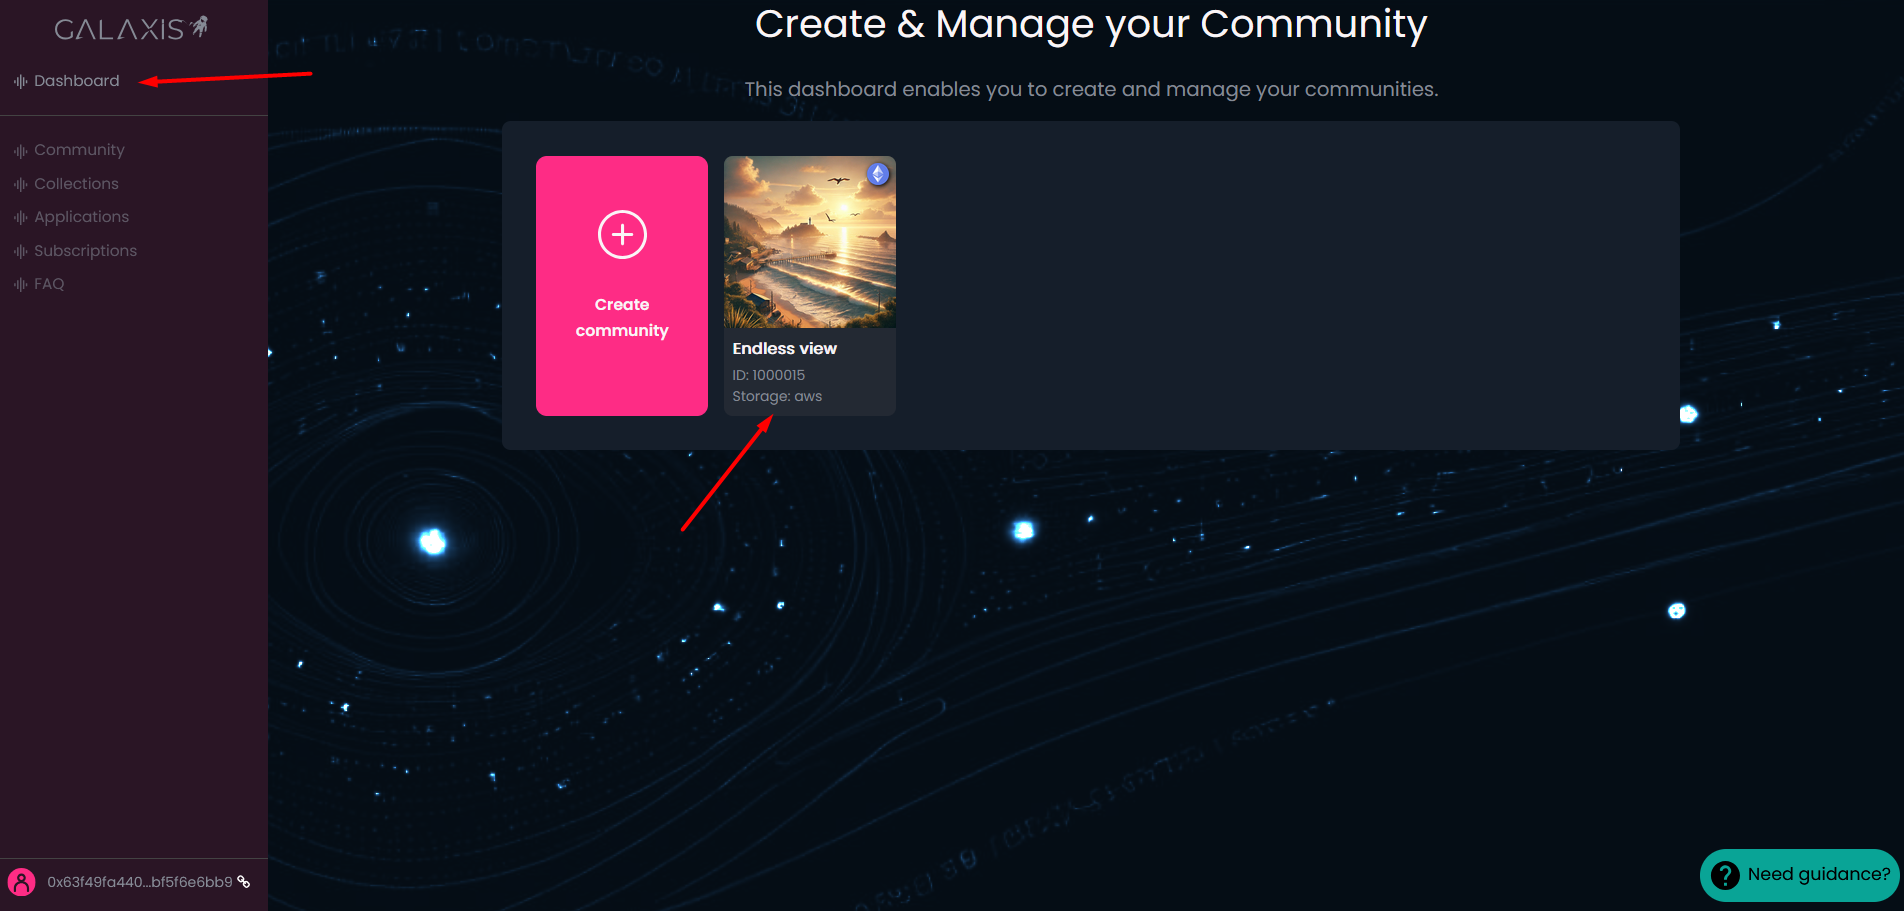
¶ Step 1
-
You are on the Mission Control - Dashboard. Select the community to which you want to add a collection.
-
Select the Collections menu.
-
Click on the Create collection button.
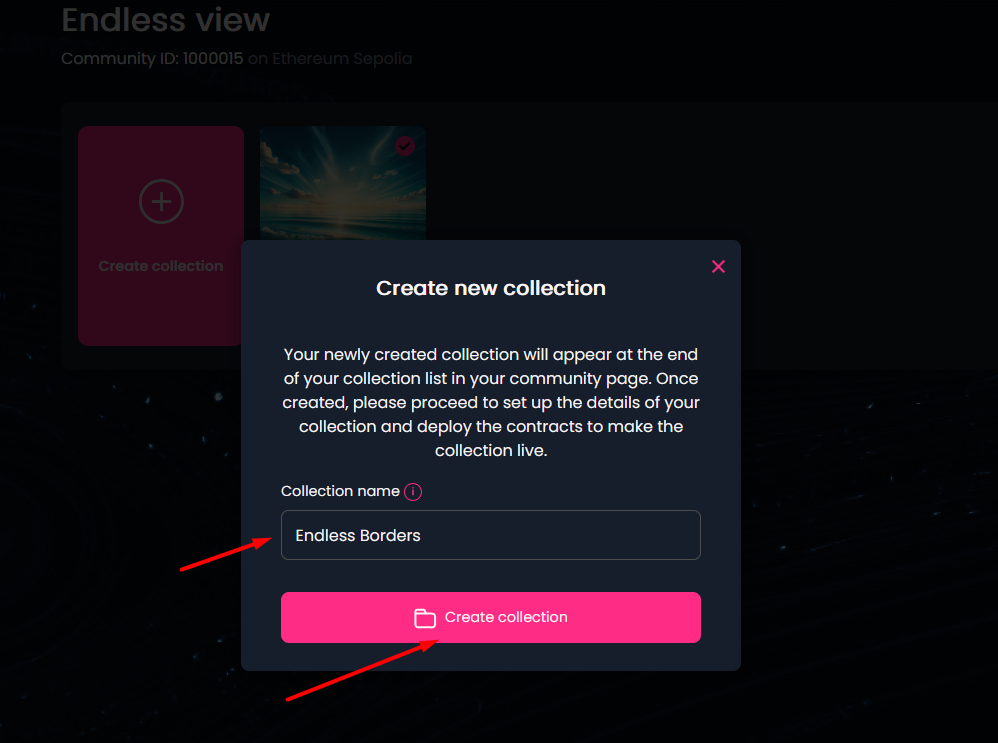
¶ Step 2
- Enter the Collection name.
- Click on the Create collection button.
¶ Step 3
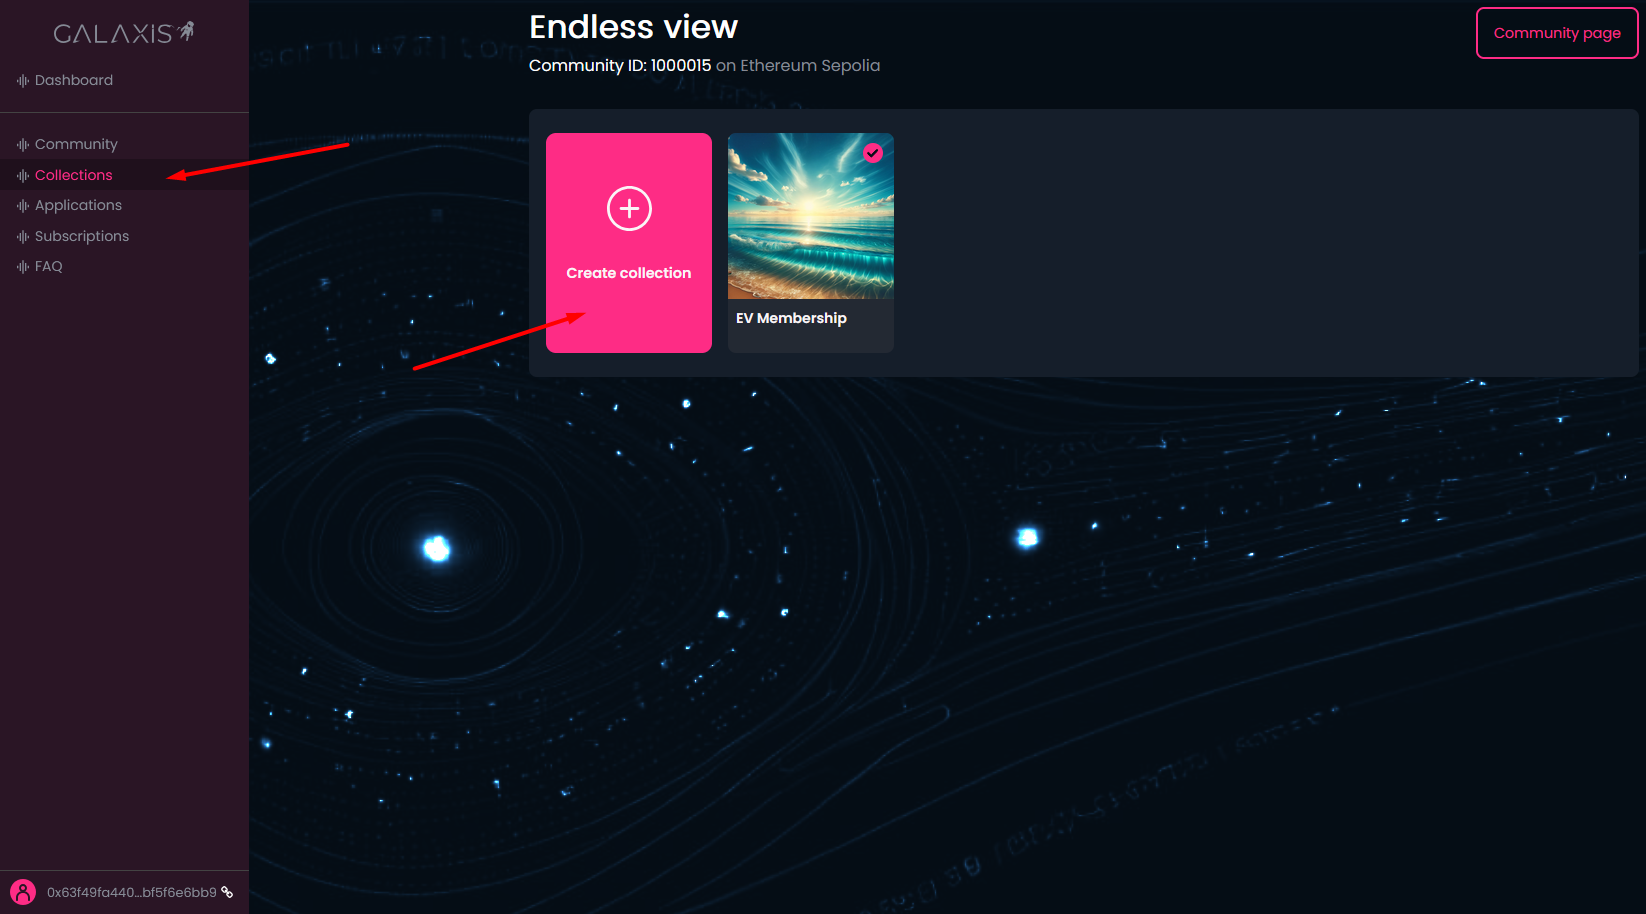
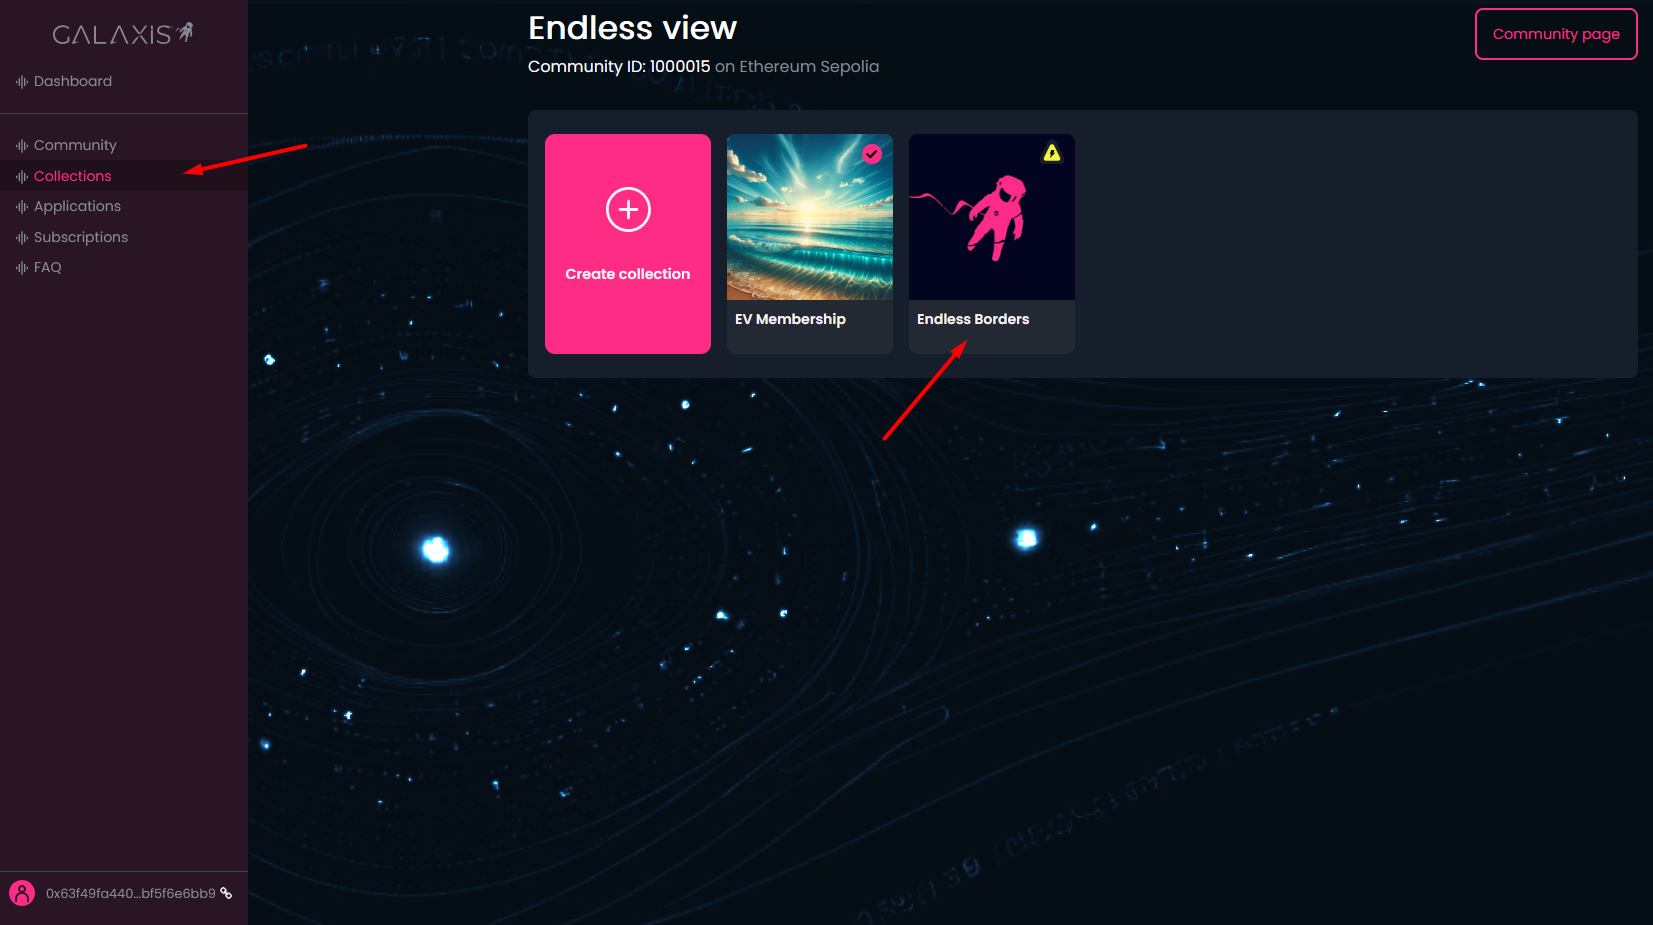
- You are on the Collections main page. Click on the collection card to define the details of your newly created collection.
-
Collection name - you can modify the previously defined name
-
Token symbol - this is a kind of "abbreviation" that you can define with the help of capital letters and numbers, and it uniquely identifies your collection
-
Collection description - a short text explaining what your collection is about
-
Total supply - the total number of cards in your collection

-
Small banner - this image will be present on the community website inside a card that will represent this collection
-
Large banner - this image will be displayed on the top of the collection page
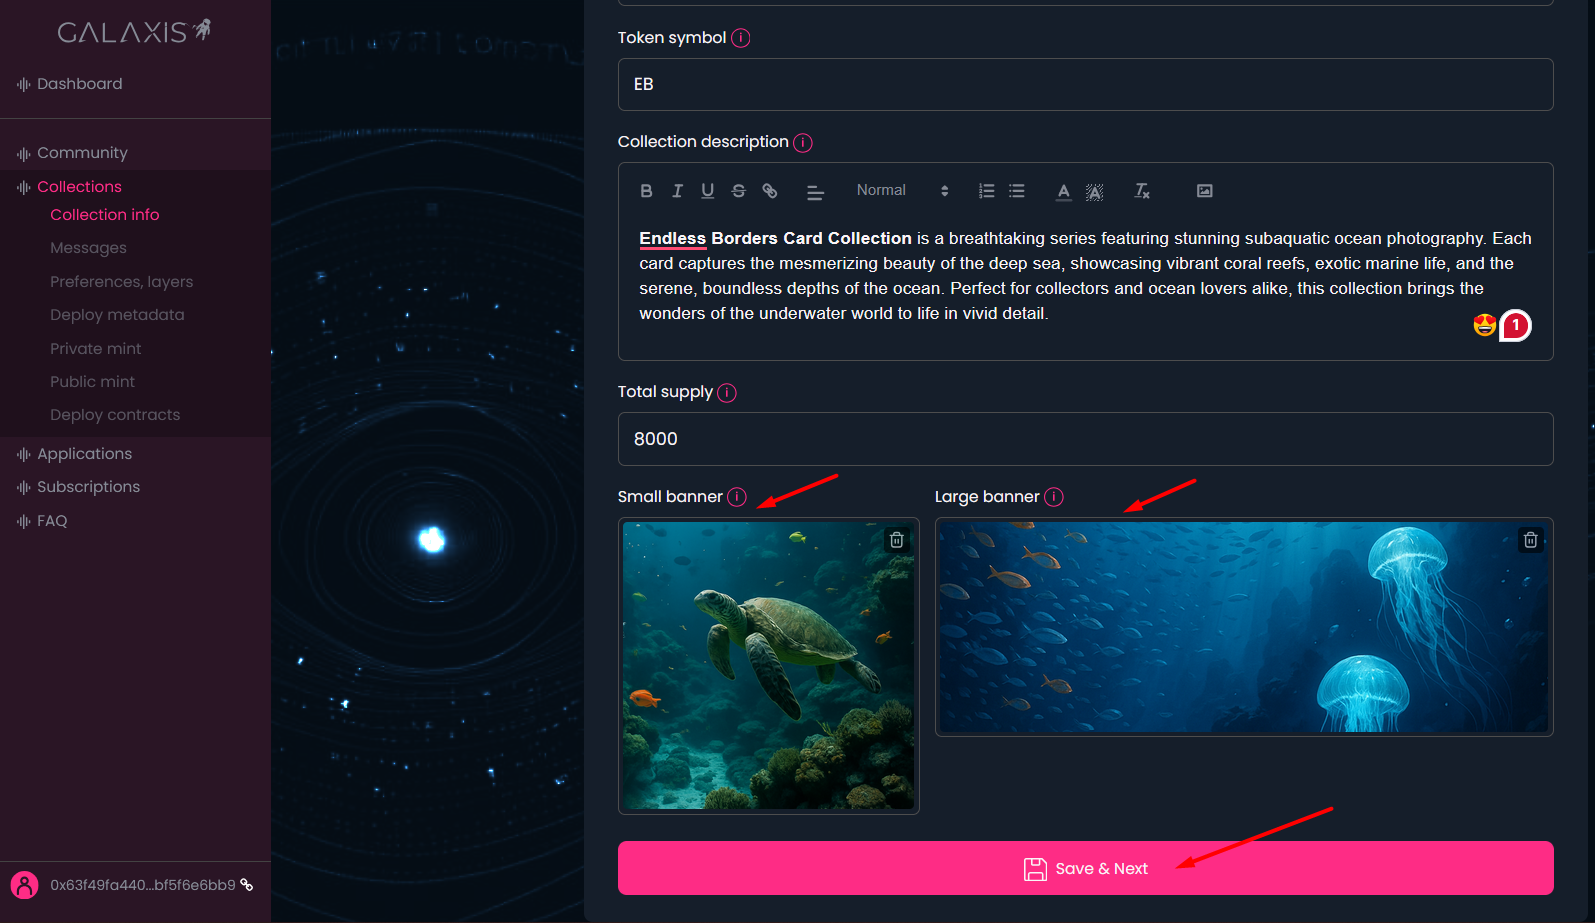
- When everything is completed - click on the Save & Next button to proceed to the next step.
¶ Step 4
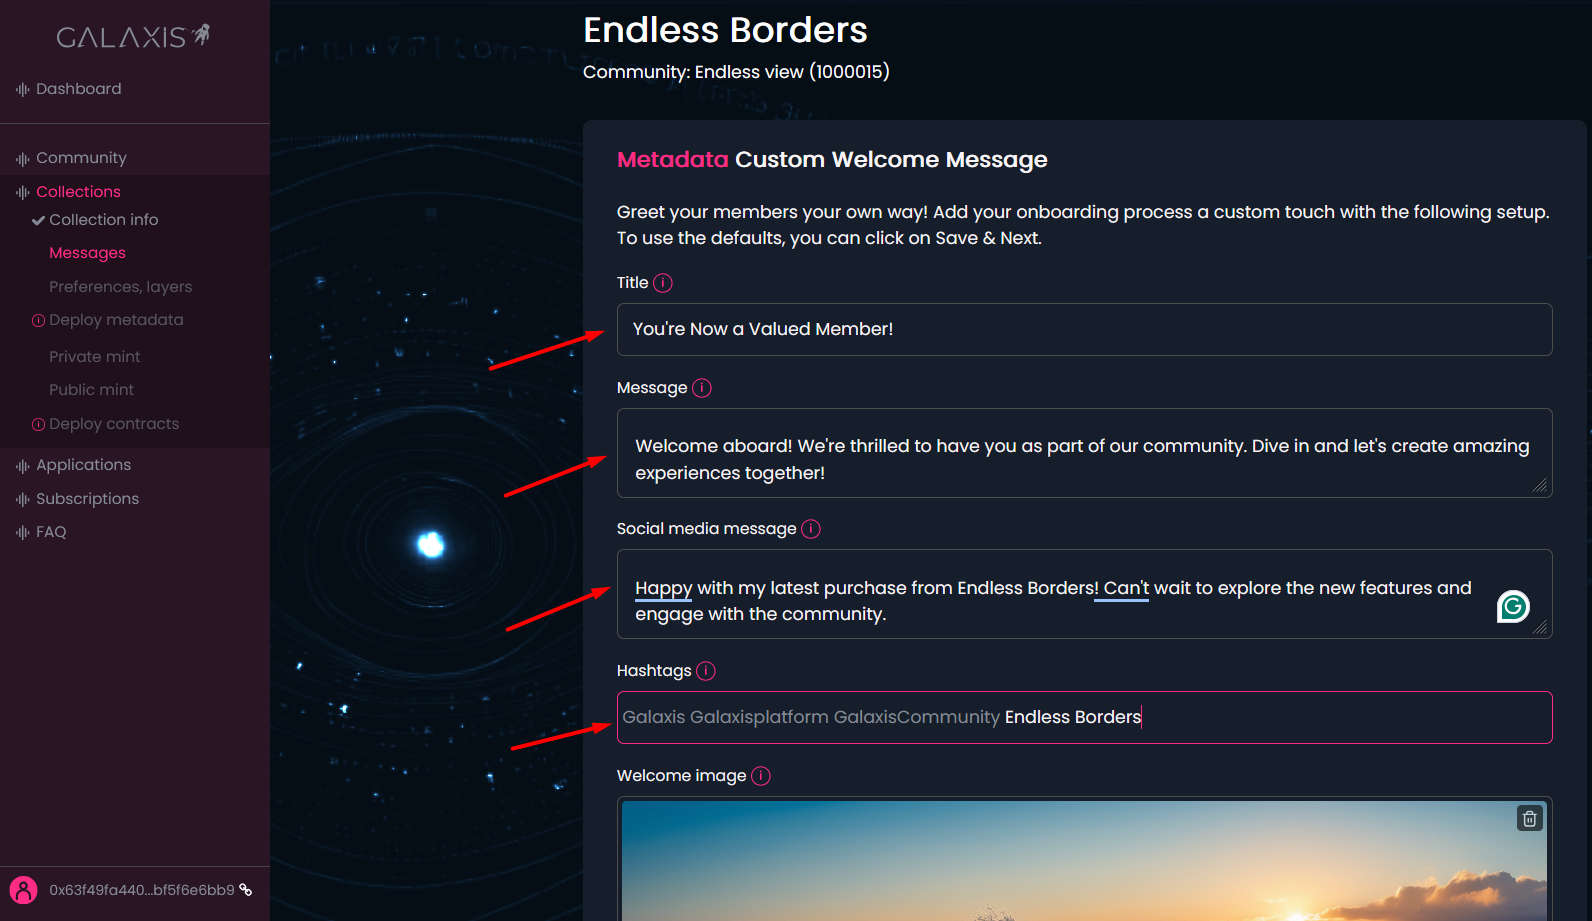
Edit the collection related messages:
- Provide a Title for your greeting that is prepared for the new community member, who just has bought a membership card, however, you are also welcome to use the default title.
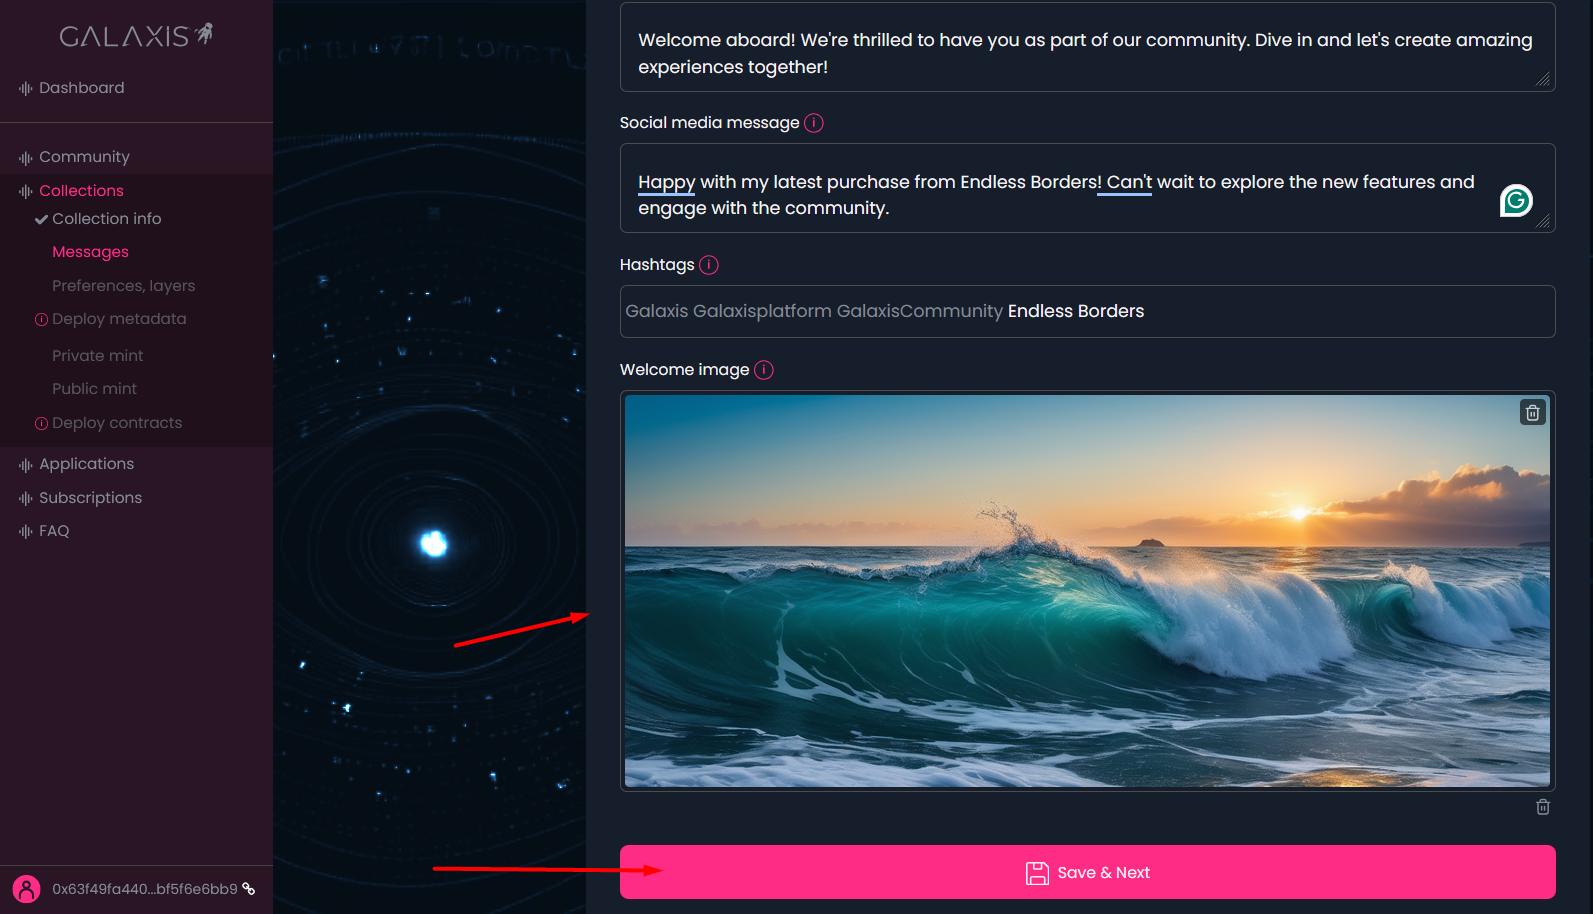
- You can use the default greeting Message here, or you can provide a new one.
- Social media message - You have the chance to compose some captivating text that, following the minting of his membership card, the new community member can share on his X account. If you would want nothing unique, feel free to utilise the default wording.
- Beside the default Hashtags, you can set new ones too.
- Please do not hesitate to upload any lovely or specific Welcome image you may have for your community. However, uploading images is not required.
- Once everything is set up click on the Save & Next button to proceed.
¶ Step 5
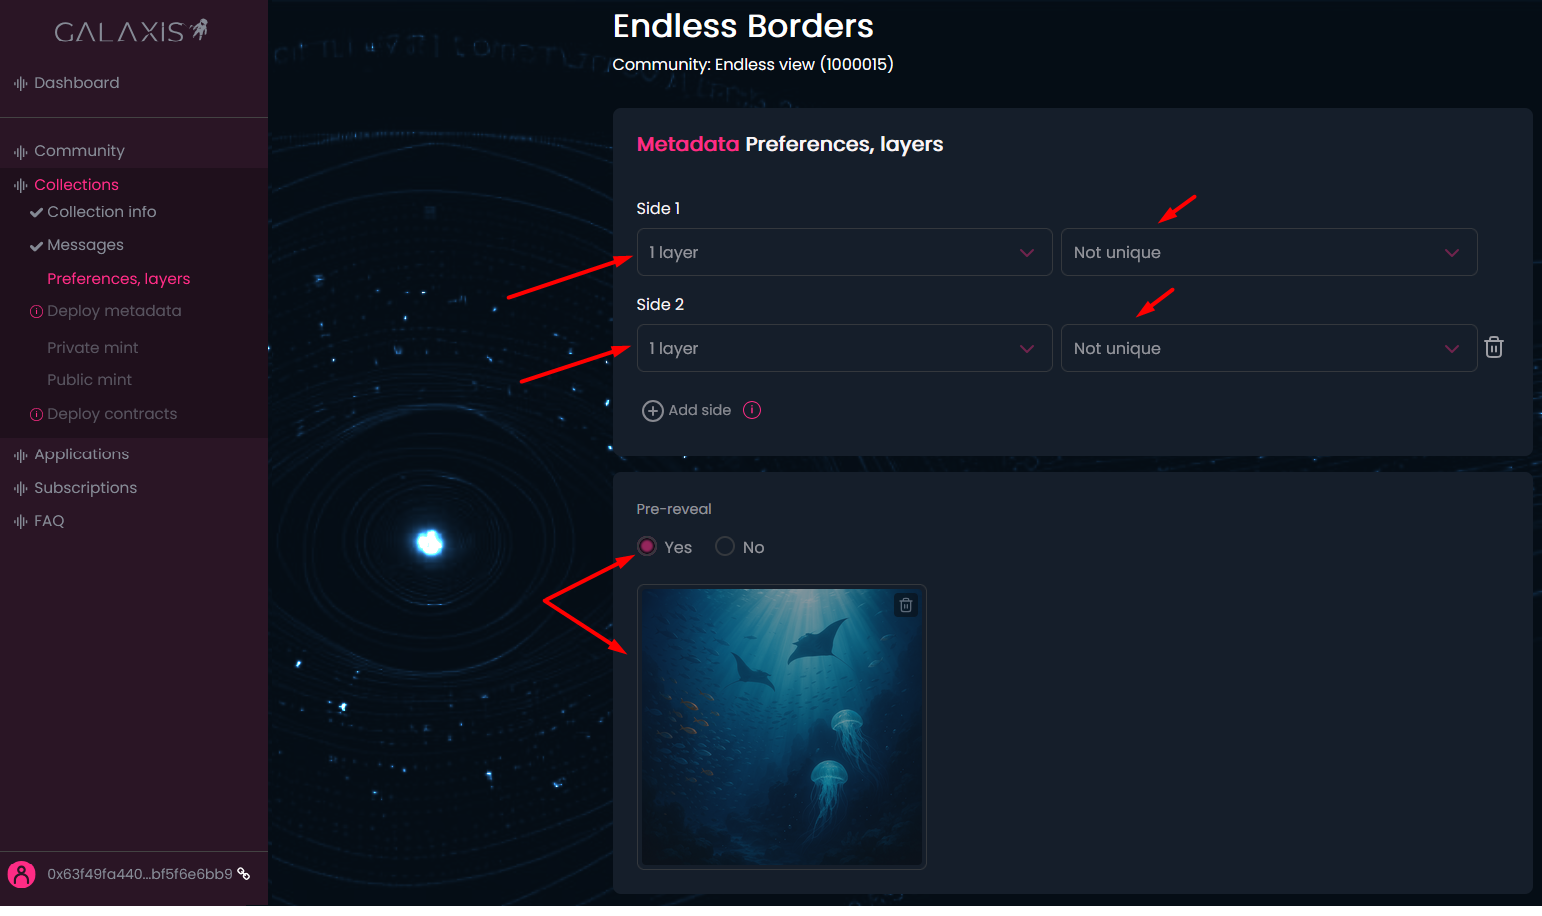
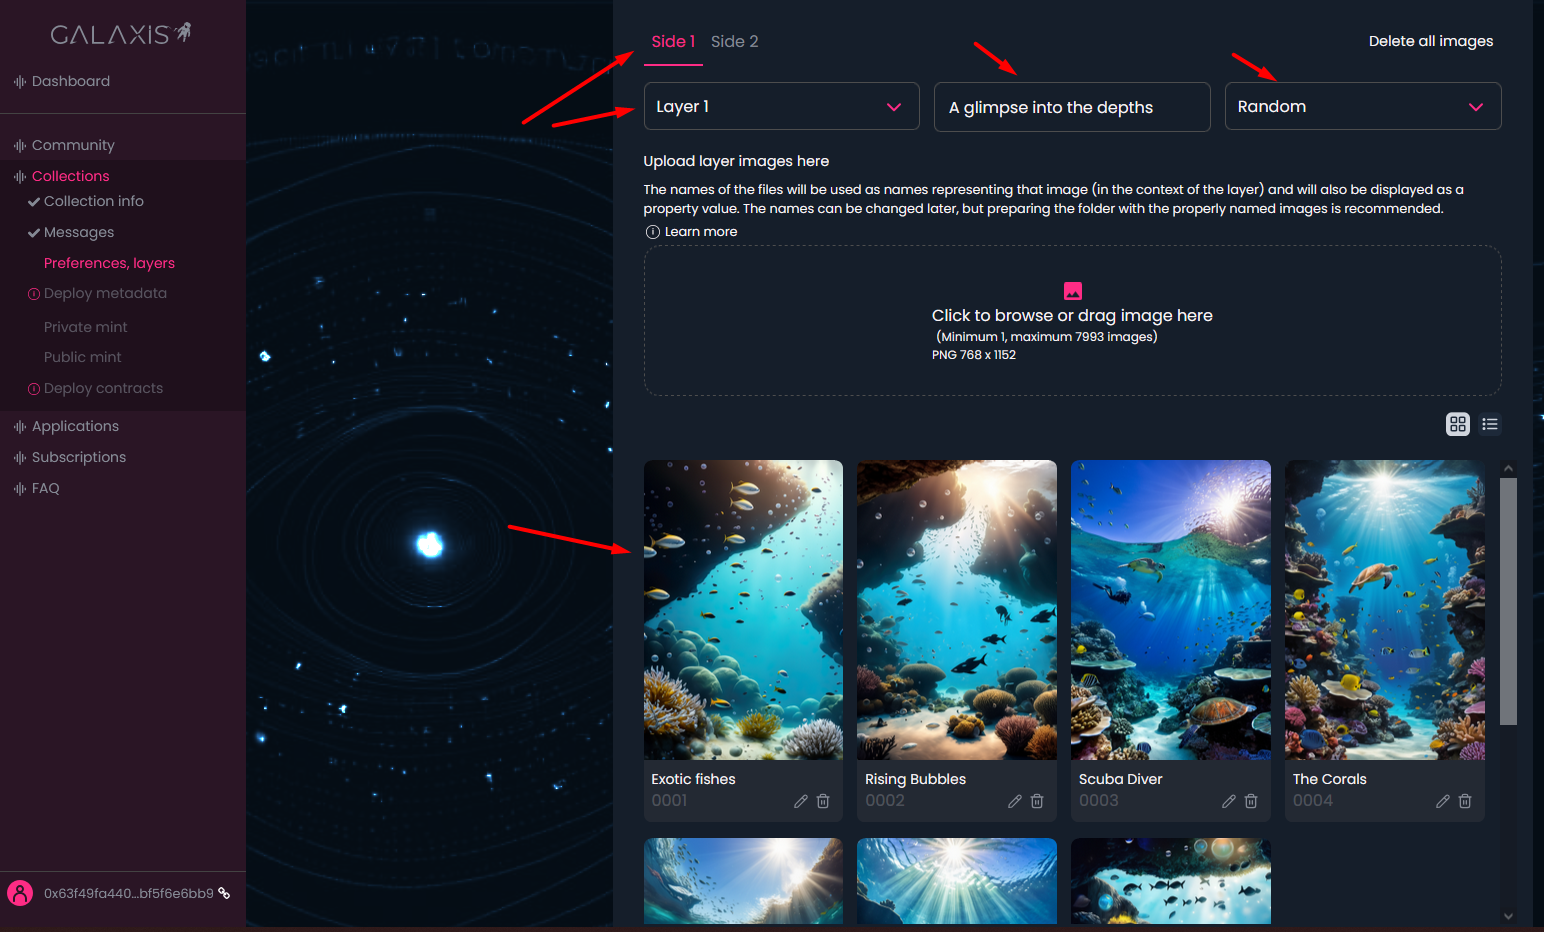
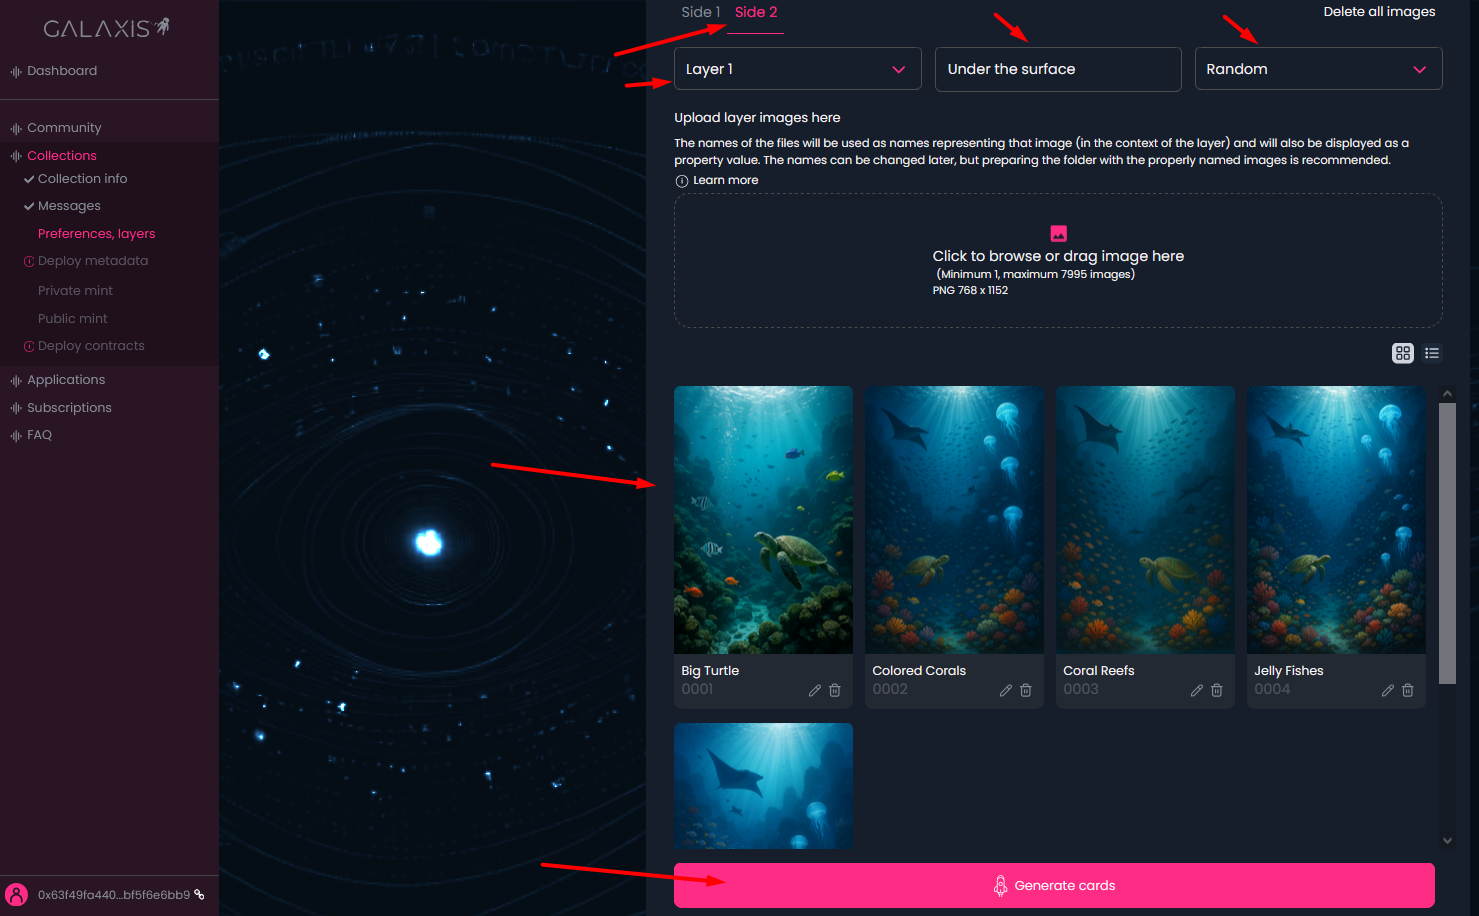
Here you can handle everything from uploading images, creating layers, combinations, managing rarities, etc. to build more sided cards.
-
Set the sides and layers of your cards.
- Click on the Add side button to add more sides. At the moment you can create two-sided cards.
- Set the layer numbers for each side. For example the first side of the card can have three layers, meaning that the Layer 1 image will be at the bottom, and Layer 2 image will be placed on the top of Layer 1 image, and Layer 3 image on the top of Layer 2 image. You can have a side composed from maximum 10 layers.
Note: You can also set the image of a side to be unique or not. If you opt for a unique image for a side, make sure to upload the appropriate number of layer images, so that the mathematical possibility of unique image generation to be valid. -
Decide if you want to use a Pre-reveal (pleacholder) image as an overlay on the collection cards on purchase or you want the cards to be visible right after purchase.
-
Upload images for each side and layer - you are free to use images of any dimensions for your collection cards. However, after choosing a specific size, all subsequent images must match those dimensions exactly.
- Select the side and the layer where you want to upload the assets.
- Provide a meaningful layer name.
- Set distribution type for each layer (random distribution is set by default, but you can choose even distribution - meaning that the uploaded layer images will be distributed evenly across the collection, and you can opt for manual distribution - meaning that you can define exactly for each layer image how many times to appear across the collection.)
Here is an explanatory video about how the layers allign to create an image for a side.
After the first uploaded image, the platform will recognize its dimensions and will display it for you.
-
When you finished setting up each detail click on the Generate Cards button.
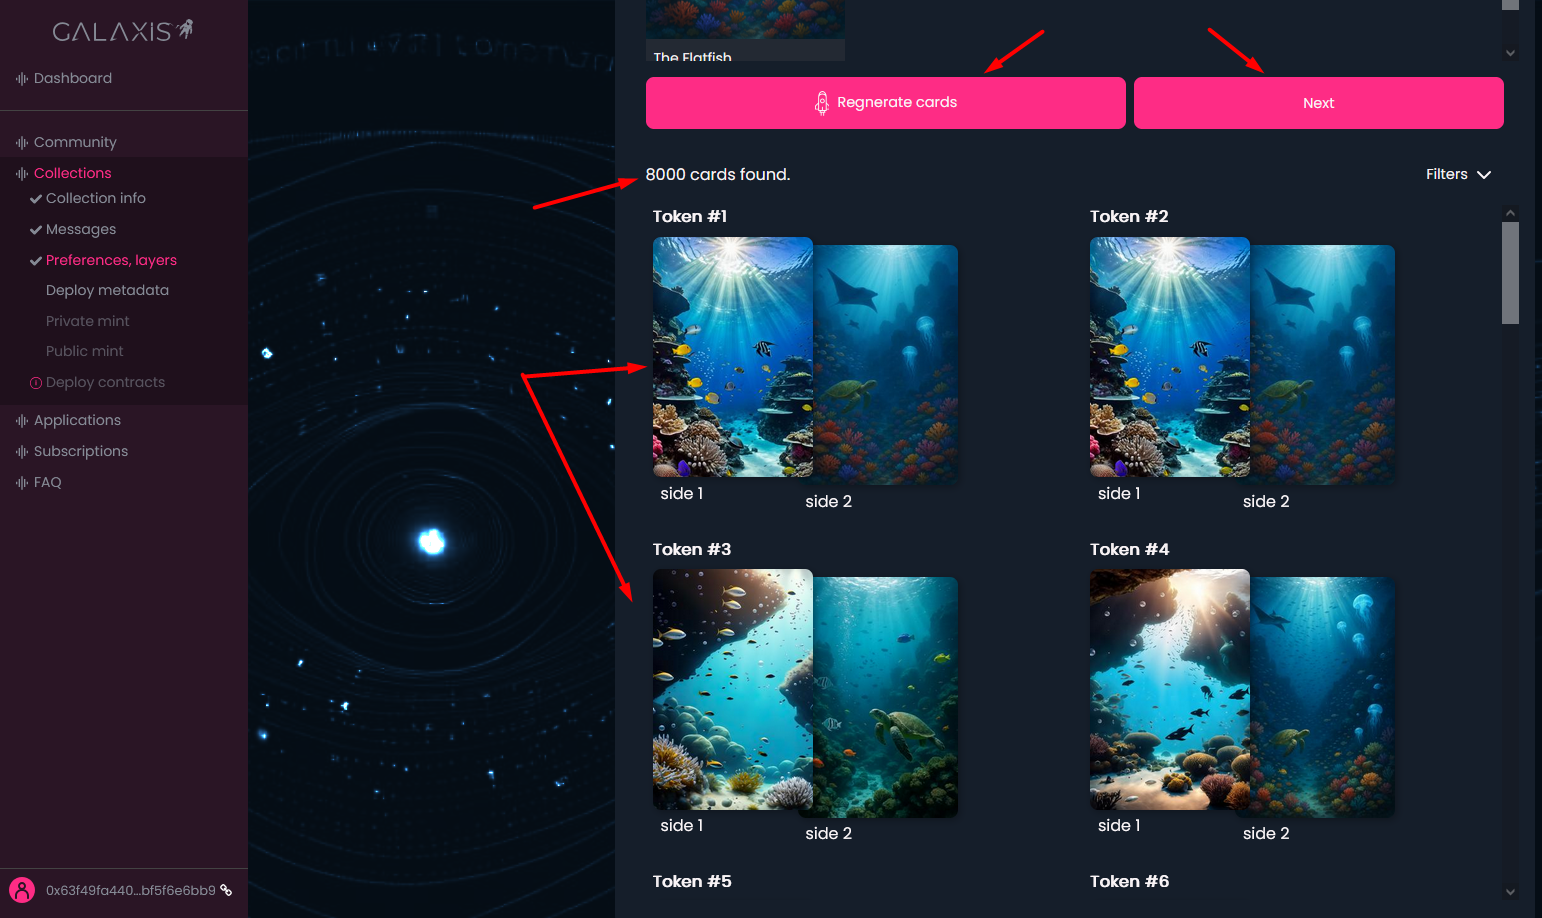
After that you can begin to preview the freshly generated cards.
¶ Step 6
- If you are not satisfied with the generated cards, (or you wish to modify the number of sides, the number of layers, or layer images, execute your changes - if any) and click on the Regenerate Cards button to obtain new membership cards.
- Preview your generated cards.
- Once you reviewed the collection and it seems fine click on the Next button to proceed to the next step.
¶ Step 7
You arrived to the point where you can deploy the metadata (the whole information related to images including sides, layers, etc.) server for your collection. After deployment the image-related details of your collection cannot be changed.
- Click on the Deploy button to deploy your metadata server.

¶ Step 8
- Here you can see your metadata server status.

You can wait until the Metadata server status shows Deployed, but you are free to move forward and configure the Private Mint and Public mint details.
¶ Step 9
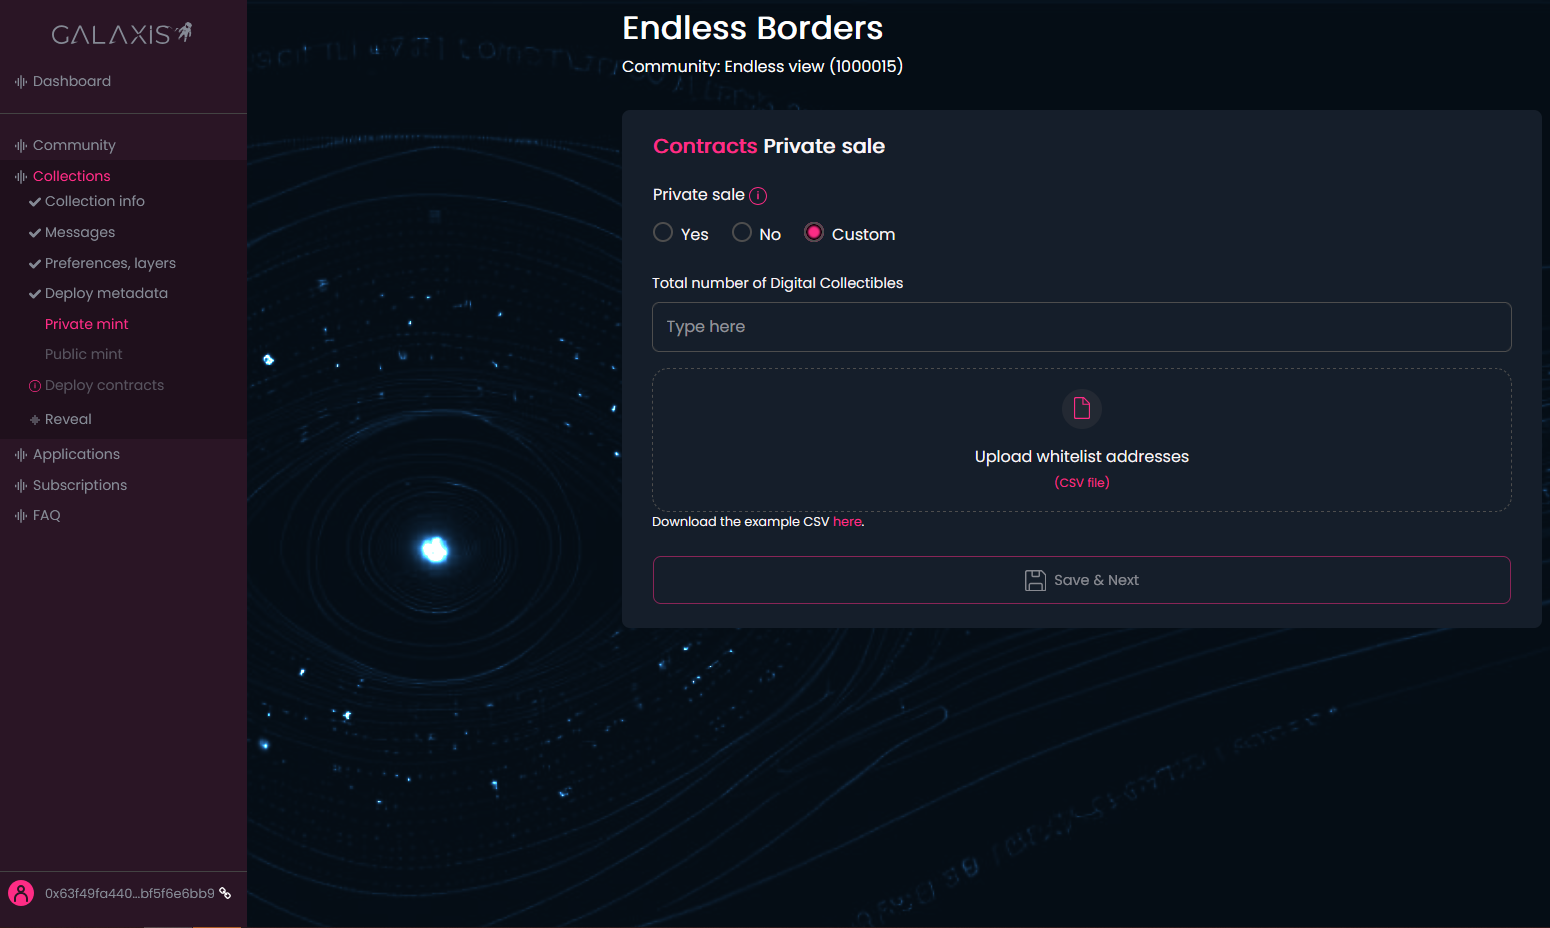
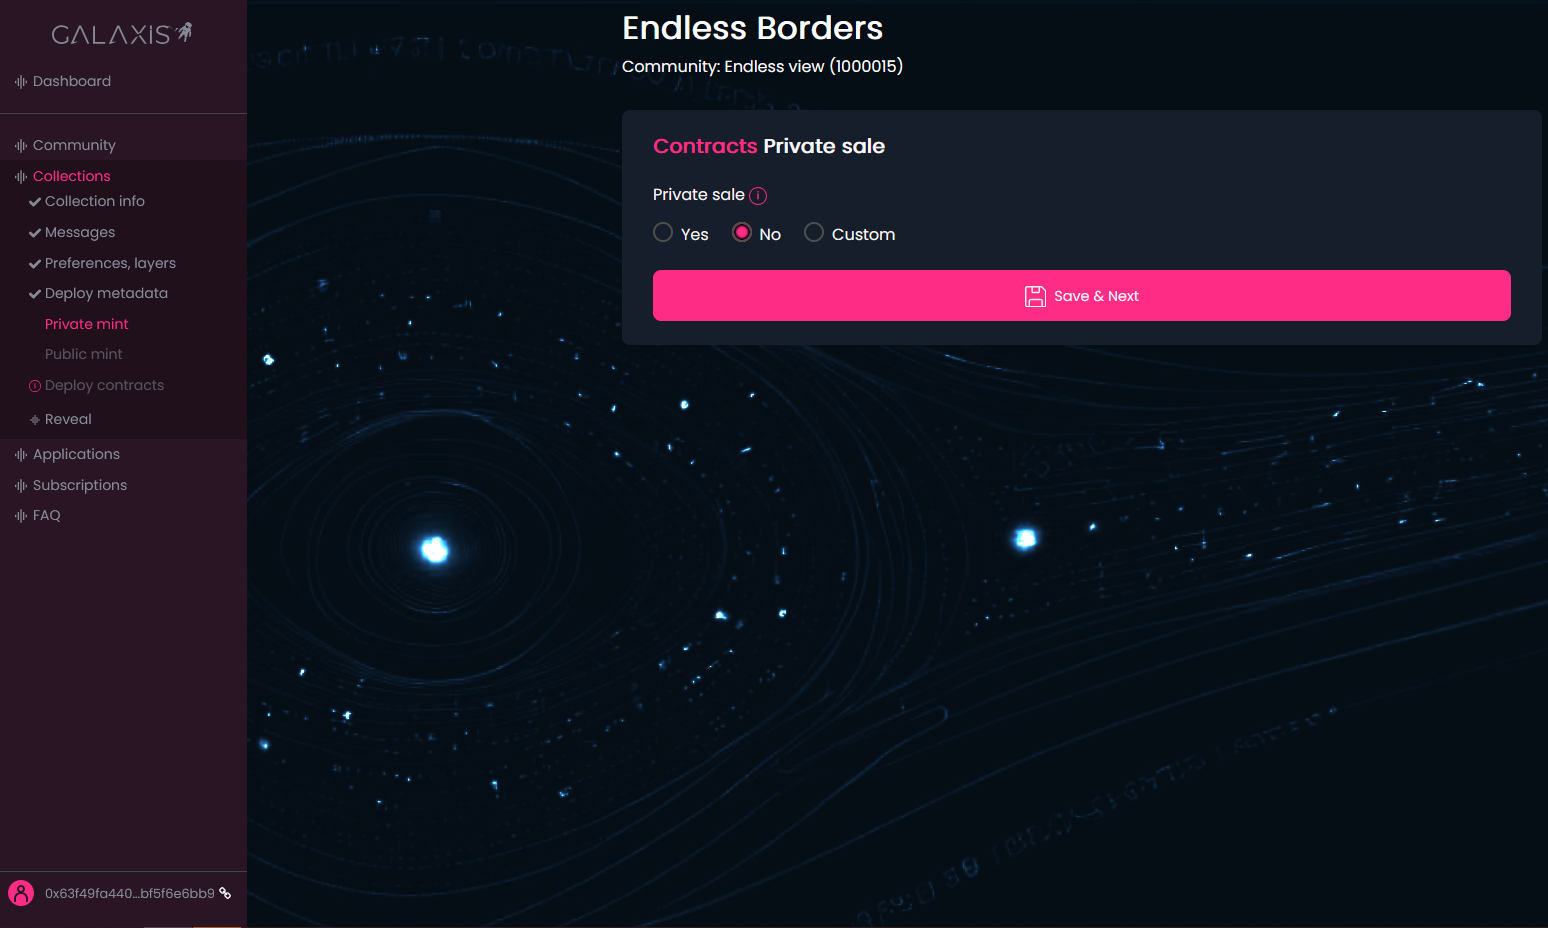
-
Select whether you want to have a private sale or not. Or you can opt for Custom sale too. Here you have to provide only the maximum number of cards available in this sale and a whitelist (a list of wallet addresses that are eligible to mint cards during the custom sale. There is an example CSV file provided that needs to be downloaded, completed with the proper addresses, token prices, start- and end dates, and finally uploaded).
-
If you want private sale, edit your private sale information:
2.a Set the Issuance Period for the private sale.
2.b (only when issuance period is limited) Set the Timezone
2.c (only when issuance period is limited) Set Start date and End date.
2.d Enter the maximum number of cards available for private sale - Total number of Digital Collectibles.
2.e Enter the maximum number of cards that can be purchased by a single wallet - Max. number of Digital Collectibles per wallet
2.f Select if you want to make a Free mint or not.
2.g (only when isn't Free mint) Select if you want to have the blockchain's native currency sale or not.
2.h (only when isn't Free mint) Set the native currency price/card.
2.i (only when isn't Free mint) Select if you want to have a Token sale (defining price in any ERC20 tokens, like USDC, DAI, etc.) or not.
2.j (only when isn't Free mint) Set the Token price/card
2.k (only when isn't Free mint) Add the Token address.
2.l Upload the whitelist of the wallet addresses eligible for private mint in CSV format. An example CSV file can be downloaded and filled in with the wallet addresses before upload. -
Click on the Save & Next button to proceed to the next step.

Note: The details of the private mint can be chainged later if needed. You just have to sign the transaction in your wallet to update the sale contract with the modified data.
¶ Step 10
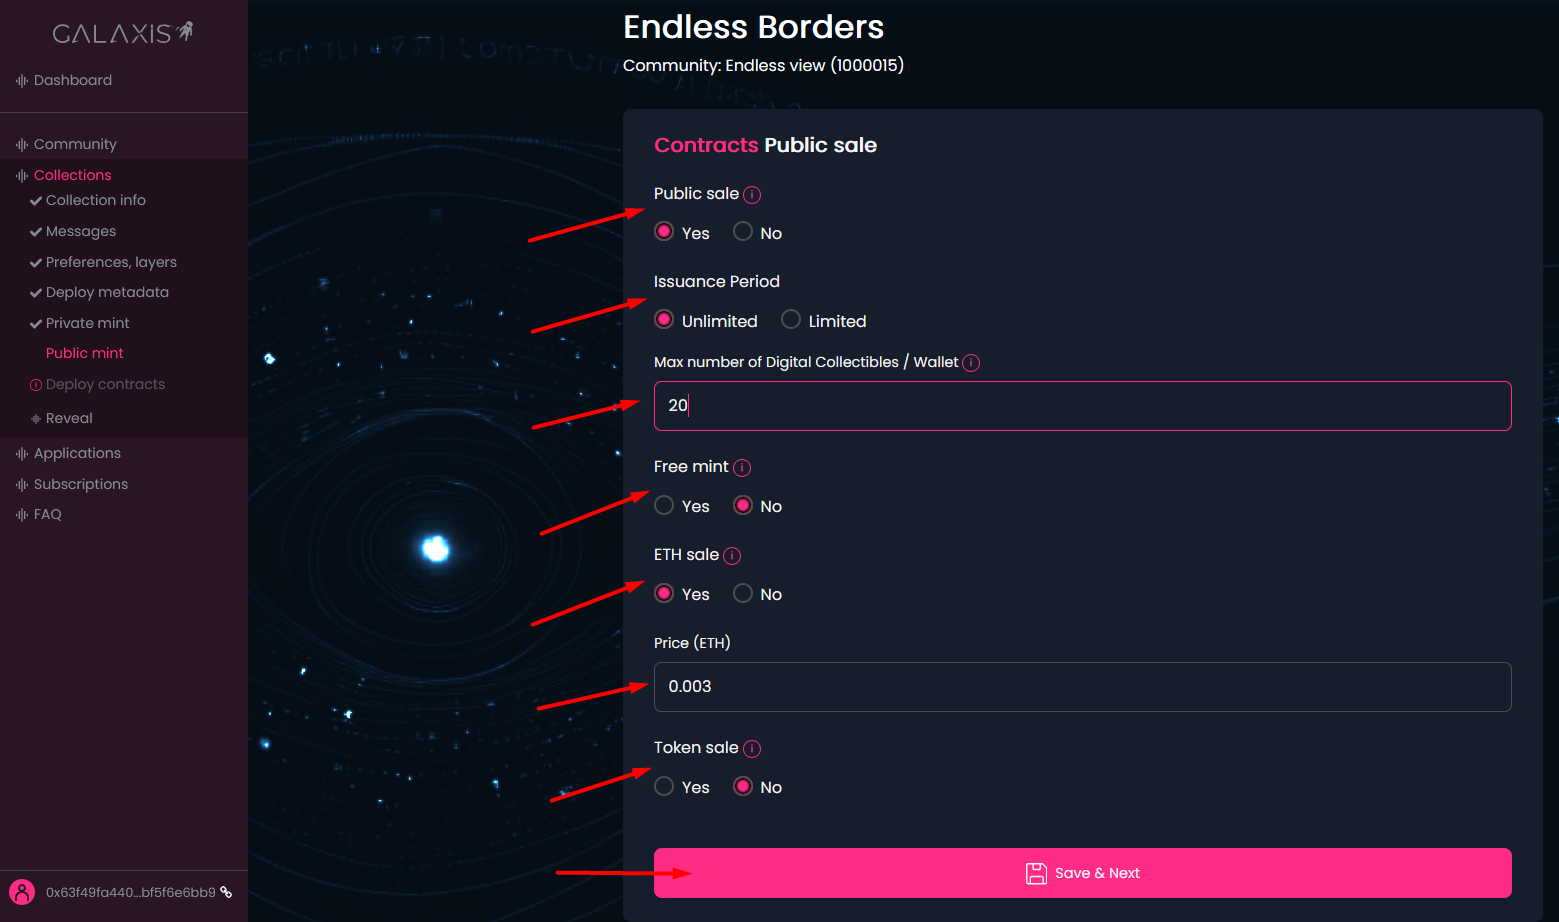
- Select whether you want to add a public mint or not. If yes, edit the public sale configuration:
2.a Set the Issuance Period for the public sale.
2.b (only when issuance period is limited) Set the Timezone.
2.c (only when issuance period is limited) Set Start date and End date.
2.d Enter the maximum number of cards that can be purchased by a single wallet - Max. number of Digital Collectibles per wallet
2.e Select if you want to make a Free mint or not.
2.f (only when isn't Free mint) Select if you want to have the blockchain's native currency sale or not.
2.g (only when isn't Free mint) Set the native currency price/card.
2.h (only when isn't Free mint) Select if you want to have a Token sale (defining price in any ERC20 tokens, like USDC, DAI, etc.) or not.
2.i (only when isn't Free mint) Set the Token price/card
2.j (only when isn't Free mint) Add the Token address. - Click on the Save & Next button to proceed to the next step.
Note: The details of the public sale can be chainged later if needed. You just have to sign the transaction in your wallet to update the sale contract with the modified data.
¶ Step 11
Here you can enter one or more wallet addresses where the sales revenue to be distributed according to the defined shares (%).
- By default, the community creator's wallet address is set with a 100% share.
- Click on the Add new address to add new addresses to the sales revenue distribution. Naturally, you have to specify the share percentage for the newly added address.
Note: the sum of the share percentages must always be 100. - Click on the Save & Next button to proceed to the next step.
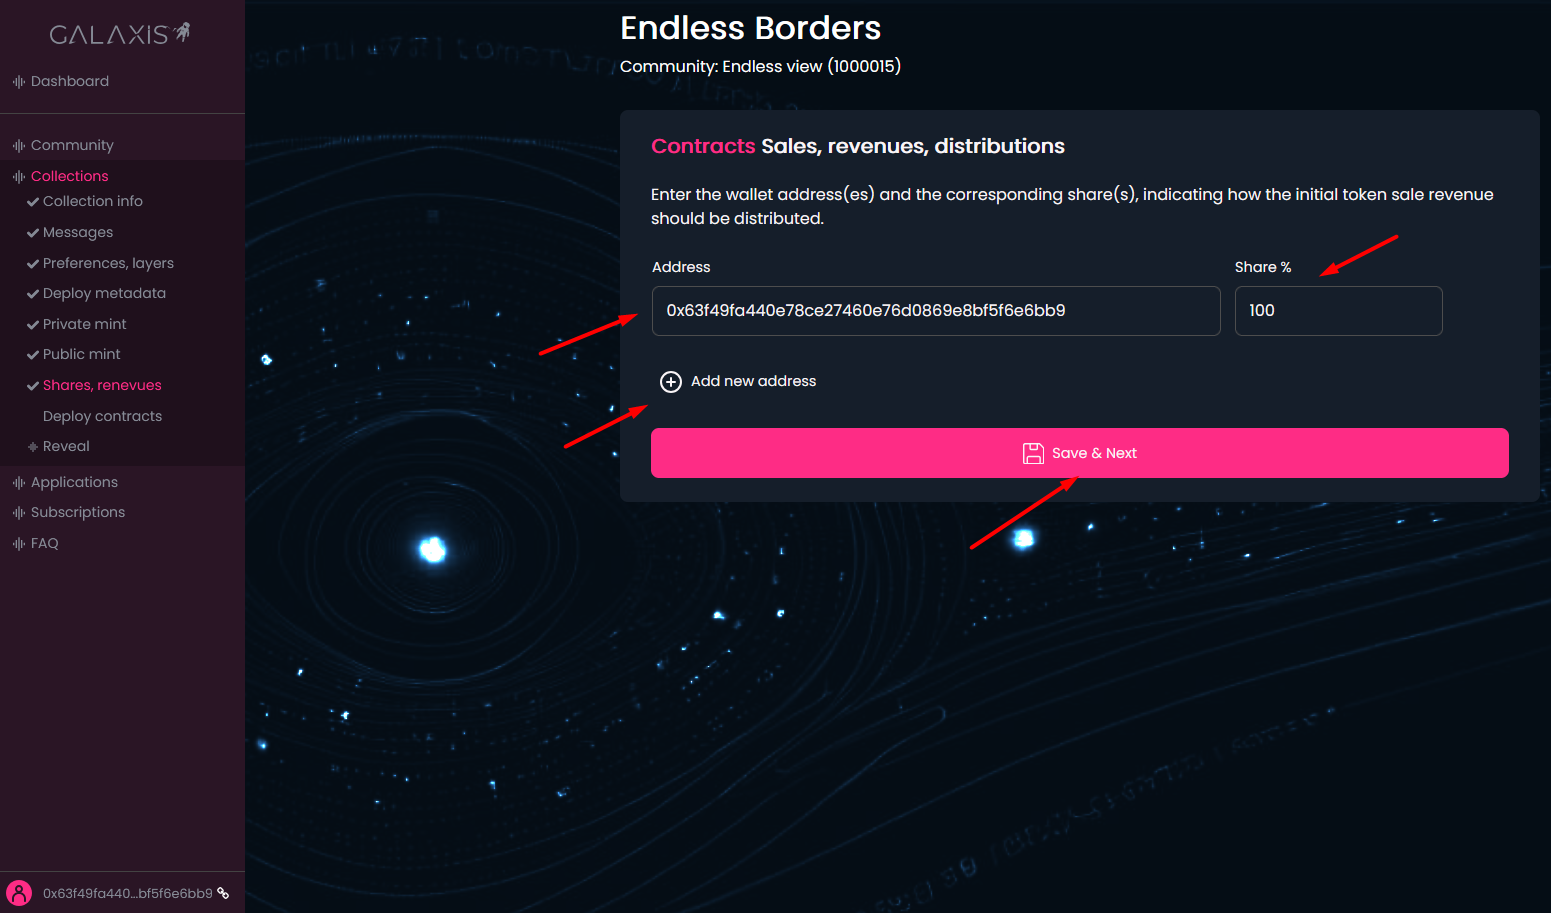
Note: You ghave to confirm if you have configured only one wallet.
¶ Step 12
- Once everything is set up - next press the Deploy contracts button to deploy the contracts to Blockchain (sale and revenue distribution settings). Of course, you have to sign the transaction in your wallet.

¶ Step 13
After the deployment of the contracts has been finished, the following modal will be prompted.
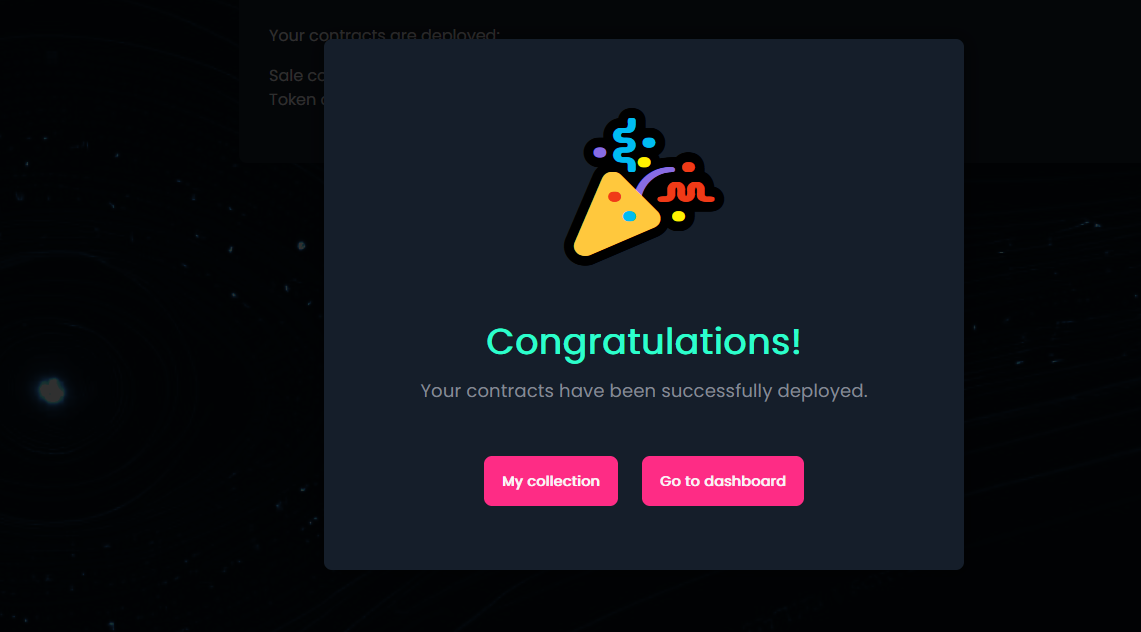
- Click on the My collection button to open the collection's page.
- Click on the Go to dashboard button to go back to the main community dashboard. From the Dashboard you can select your community and the newly created collection where you can check the deployed sale and token contracts.

Congratulations! Your collection is available on the community website. Fans, visitors can mint cards during the private sale or public sale (depending how you have configured).
They can see the following on the community website depending on the actually active sale type:
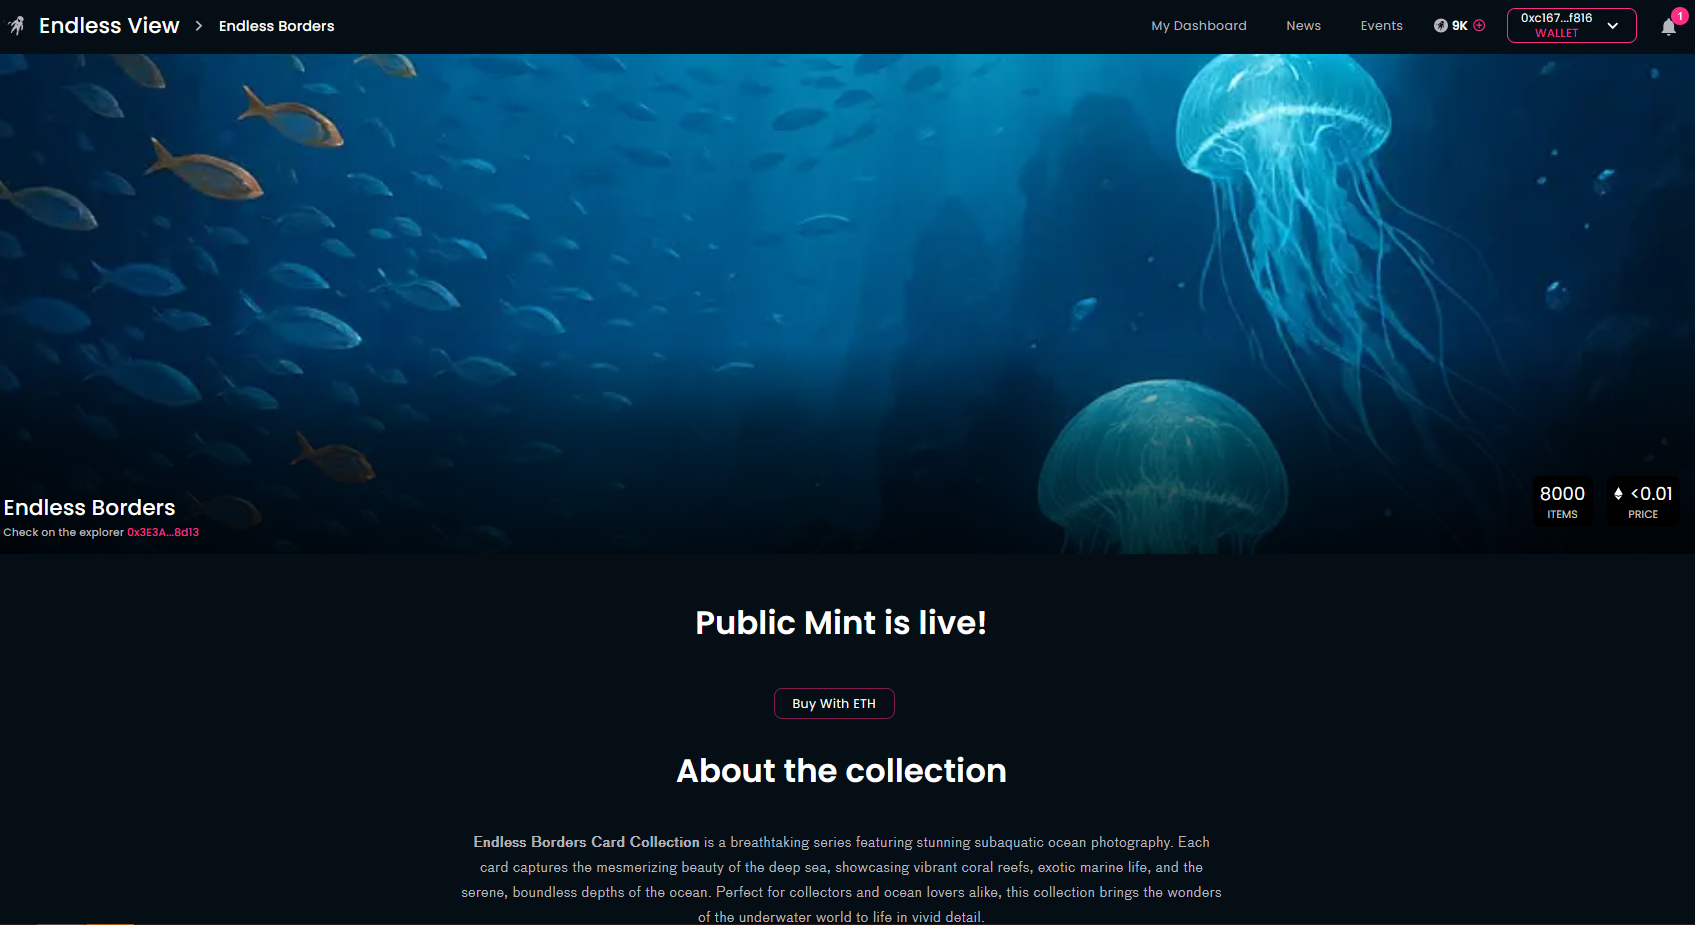
When the community members purchase cards from your collection, they will only see the unrevealed cards in their wallets, so the pre-reveal image, that was set by you, will represent the cards.
¶ Step 14
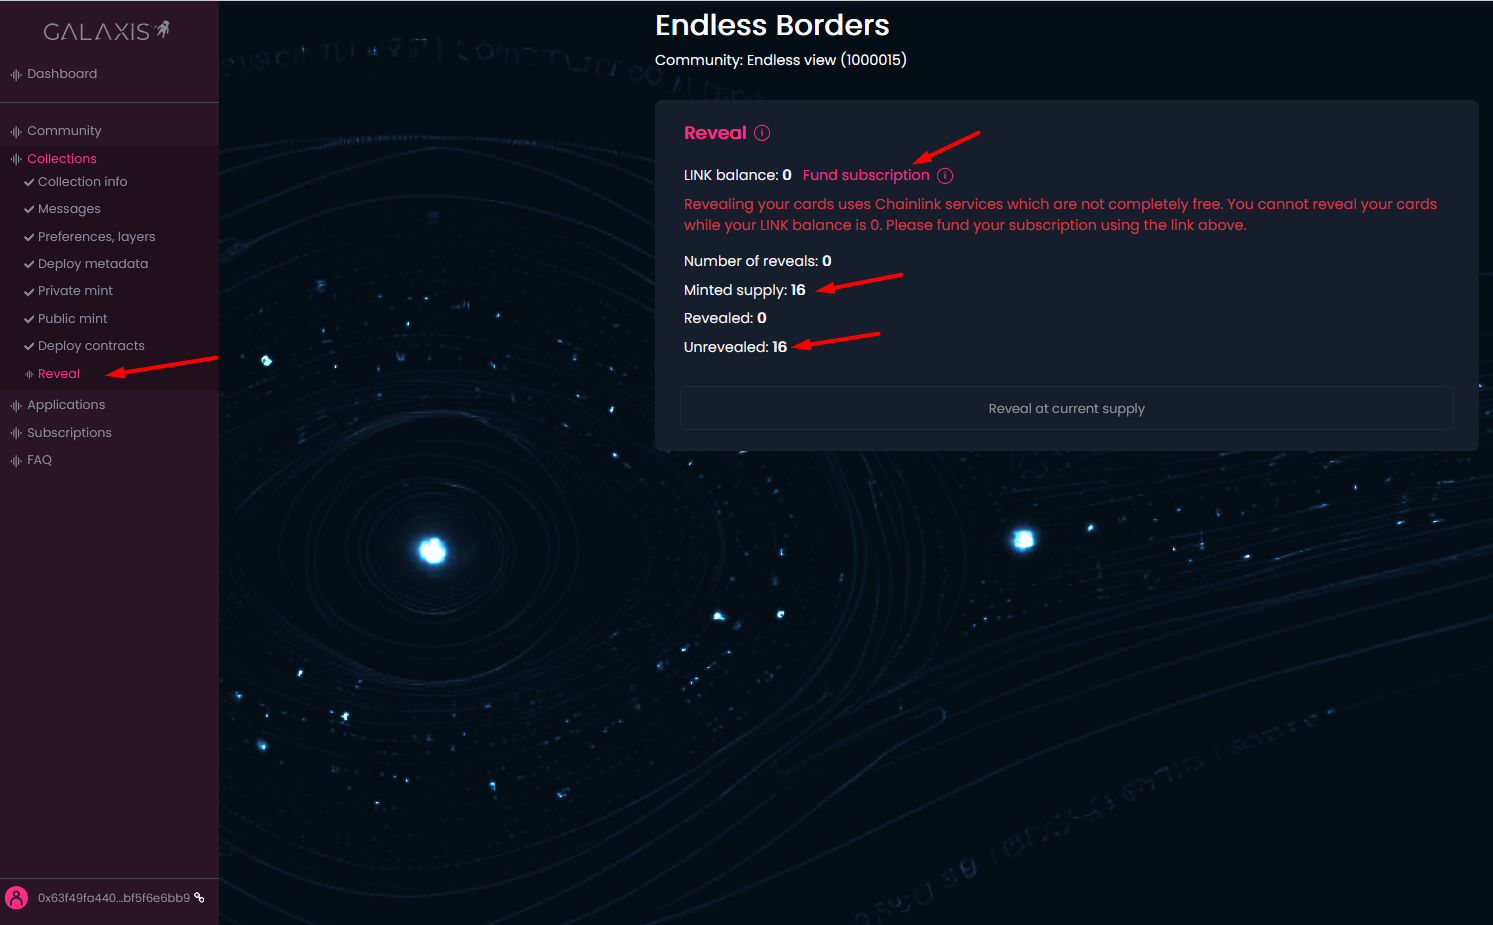
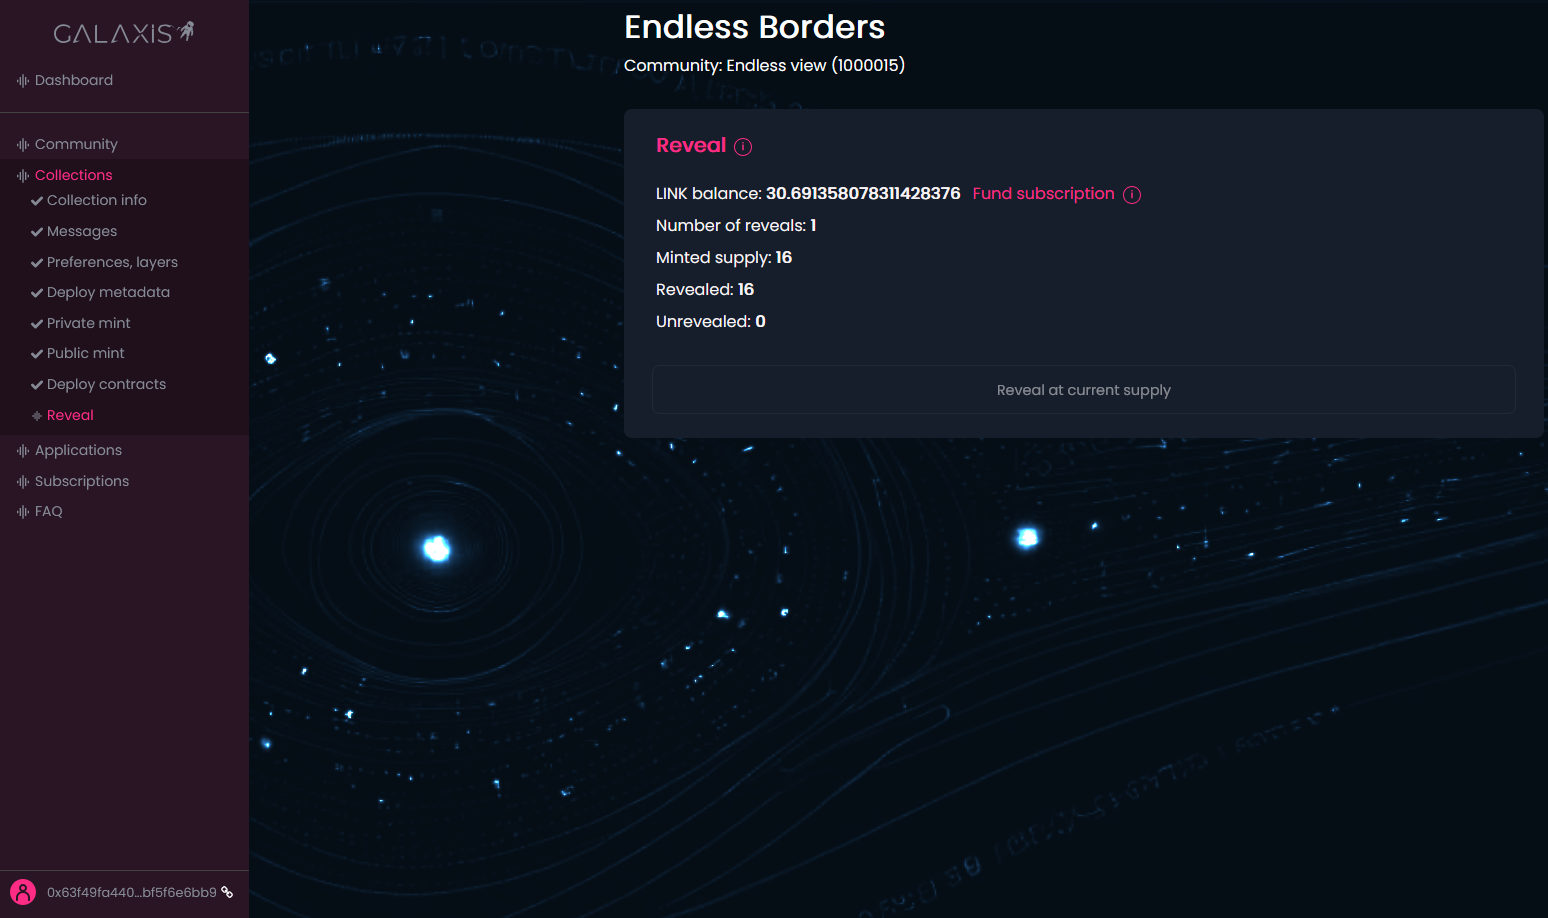
You are on the Reveal page inside a secondary collection in your community.
You can run the reveal process (disclose the real images of the cards, if you have used a pre-reveal image for your collection) for the already purchased cards.
You are able to check the Number of reveals (initially this shows 0), the Minted supply (meaning the already purchased cards), the number of revealed cards (initially this shows 0 too) and the number of unrevealed cards.
-
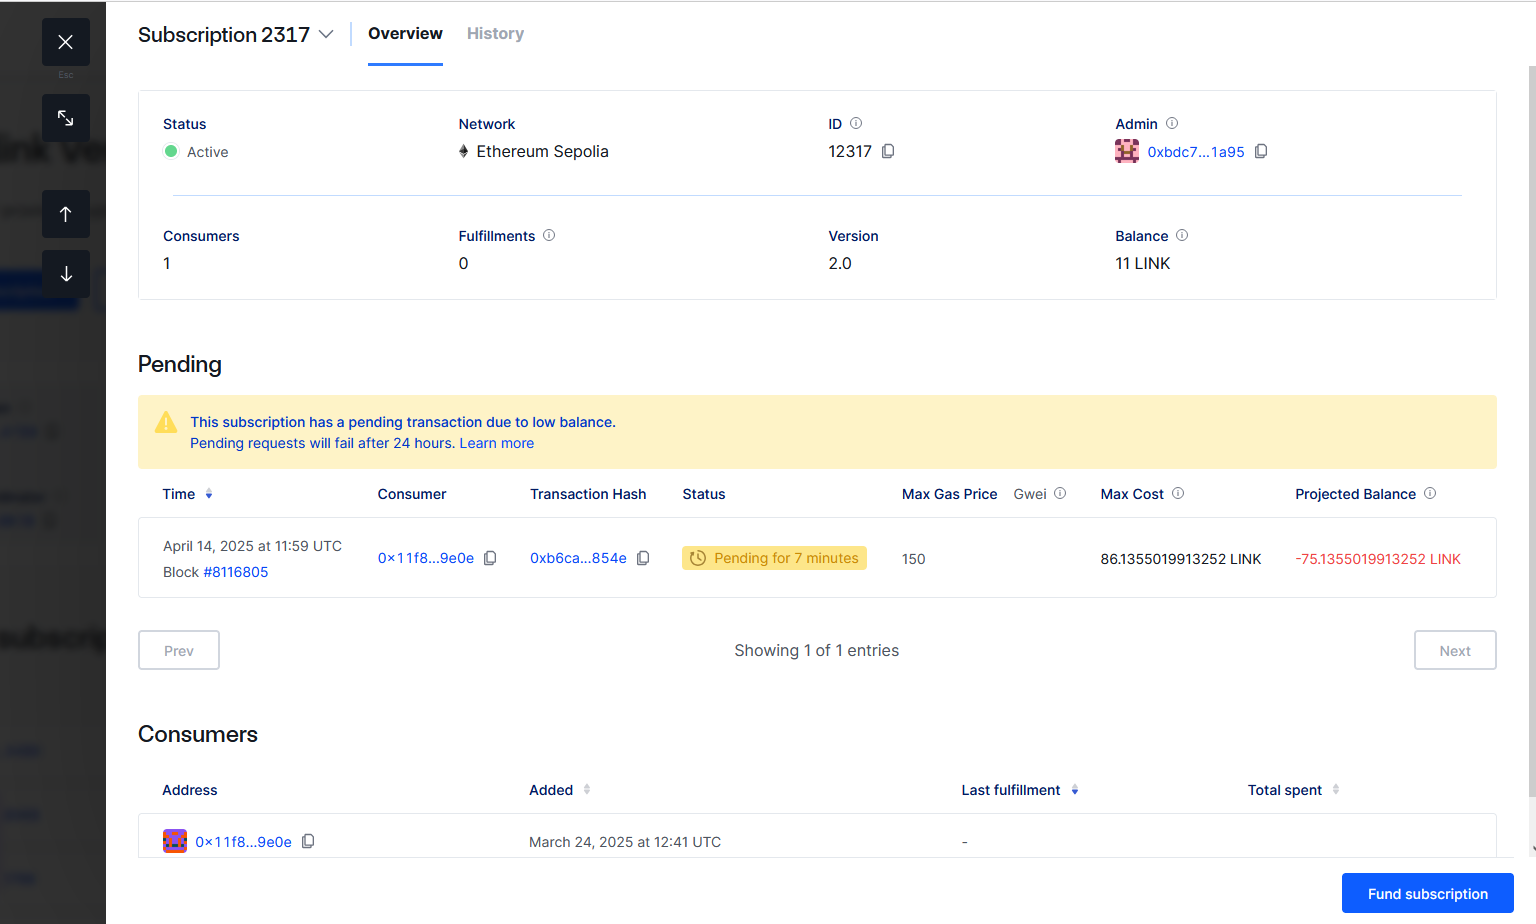
For the reveal process we are using the Chainlink Verifiable Random Function, which is a paid service. Please fund your subscription with LINK, because you cannot reveal your cards while your LINK balance is 0. To process, follow the Fund subscription link.
-
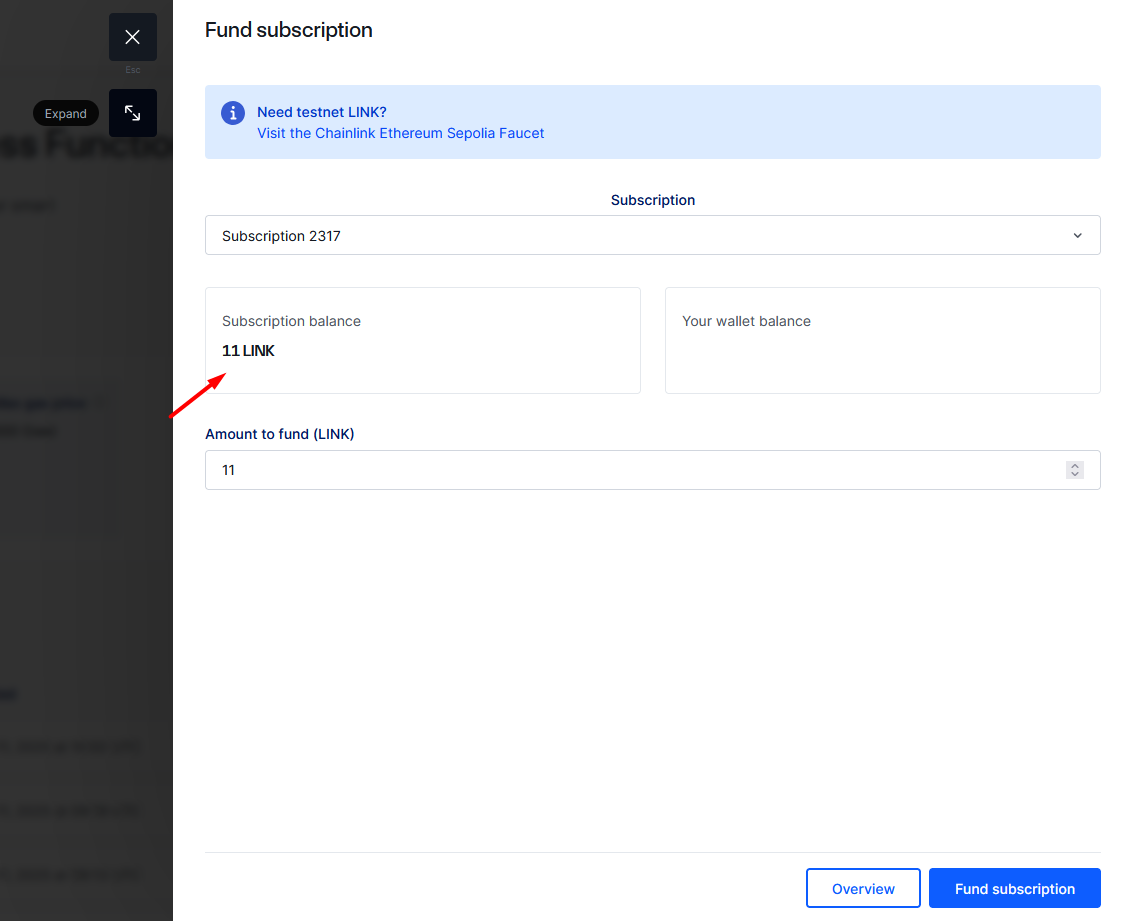
This will lead you to the Chainlink's VRF page, where you continue with the Fund subscription button.

-
Here you can see your subscription balance and your wallet balance. Sometimes it takes a longer time for the Chainlink to write out the balance of your wallet, but make sure you have LINK tokens in your wallet, even if the website does not show it. In case you do not have any, then please purchase some.
Type in the amount of LINK tokens you want to add to your subscription and approve the transaction in your wallet.

-
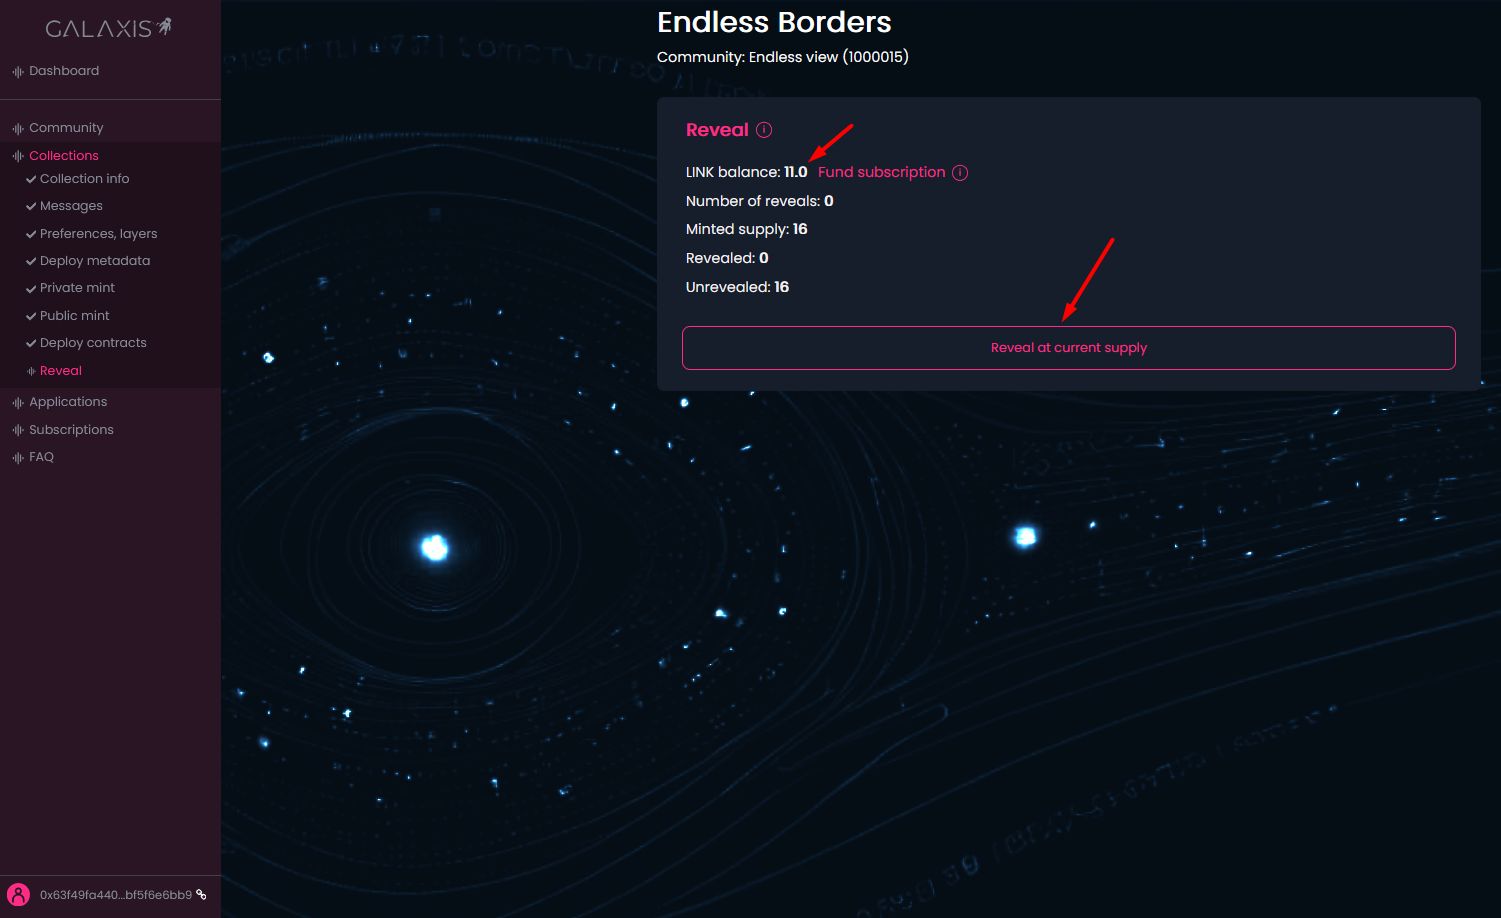
When the transaction has finished you can see the new subscription balance.
-
Now please return to the Galaxis Platform and give a refresh to the page if your new balance is not visible yet. Now click on the Reveal at current supply button to run the reveal process.
-
You can check the reveal process status if you click again on the Fund subscription link. This will lead you to the Chainlink's VRF subscription page, where it is visible if the transaction is still pending or it is fulfilled. You can consider adding more funds to your subscription if your balance seems too low.
-
After the reveal transaction has finished you can see the remaining balance.
-
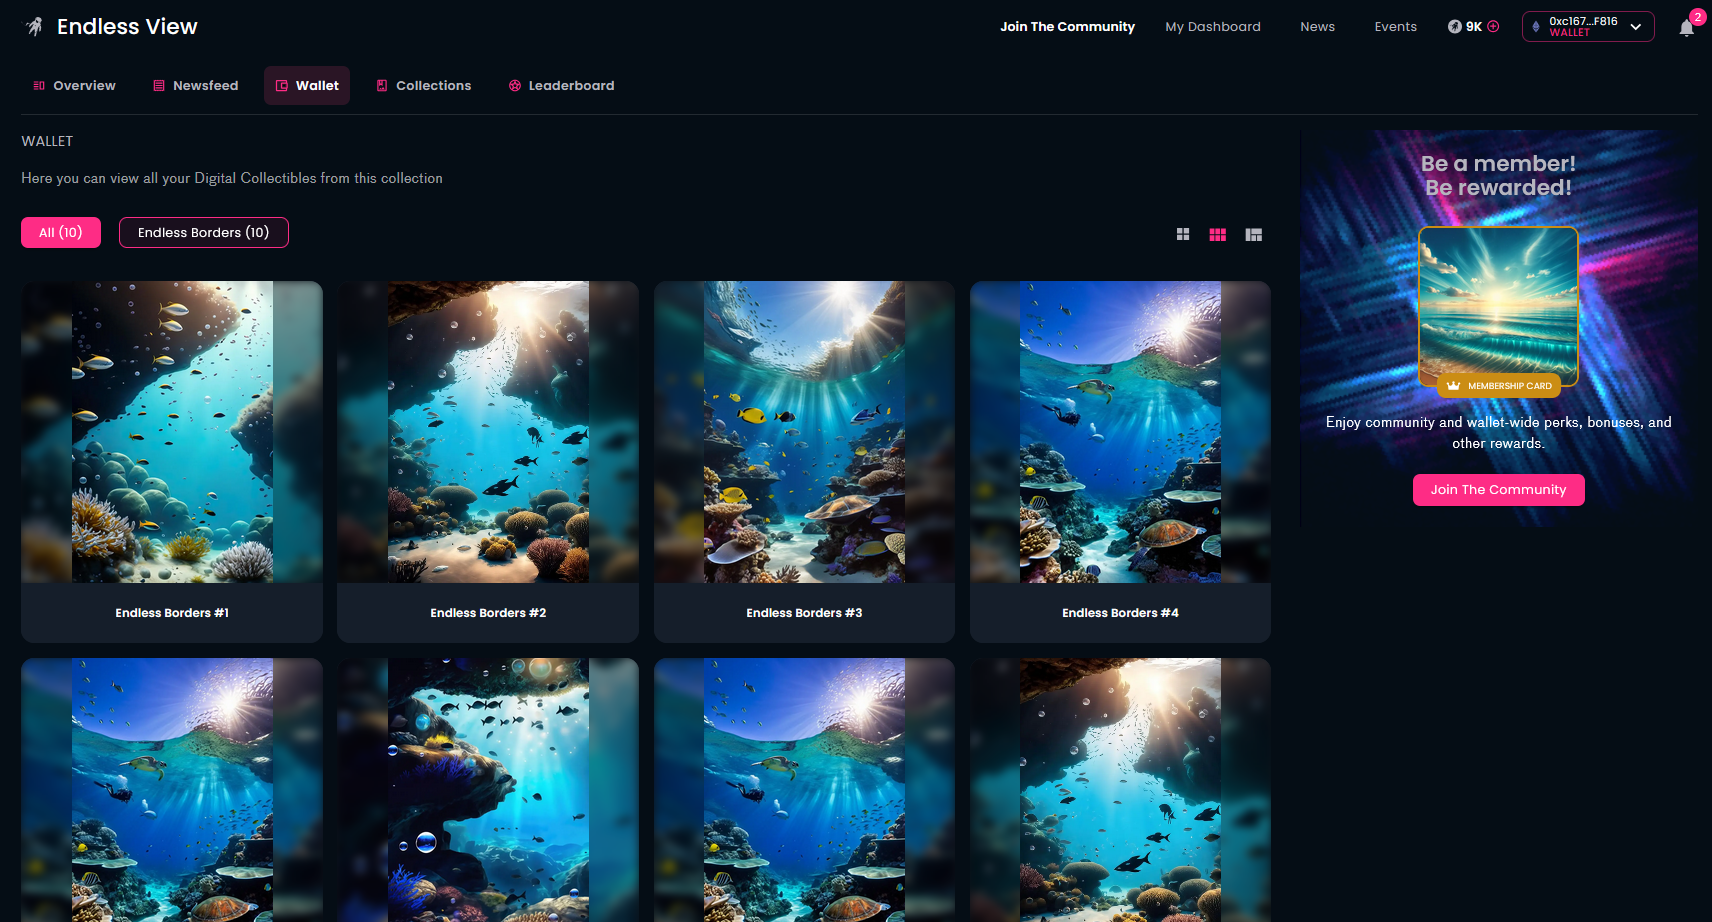
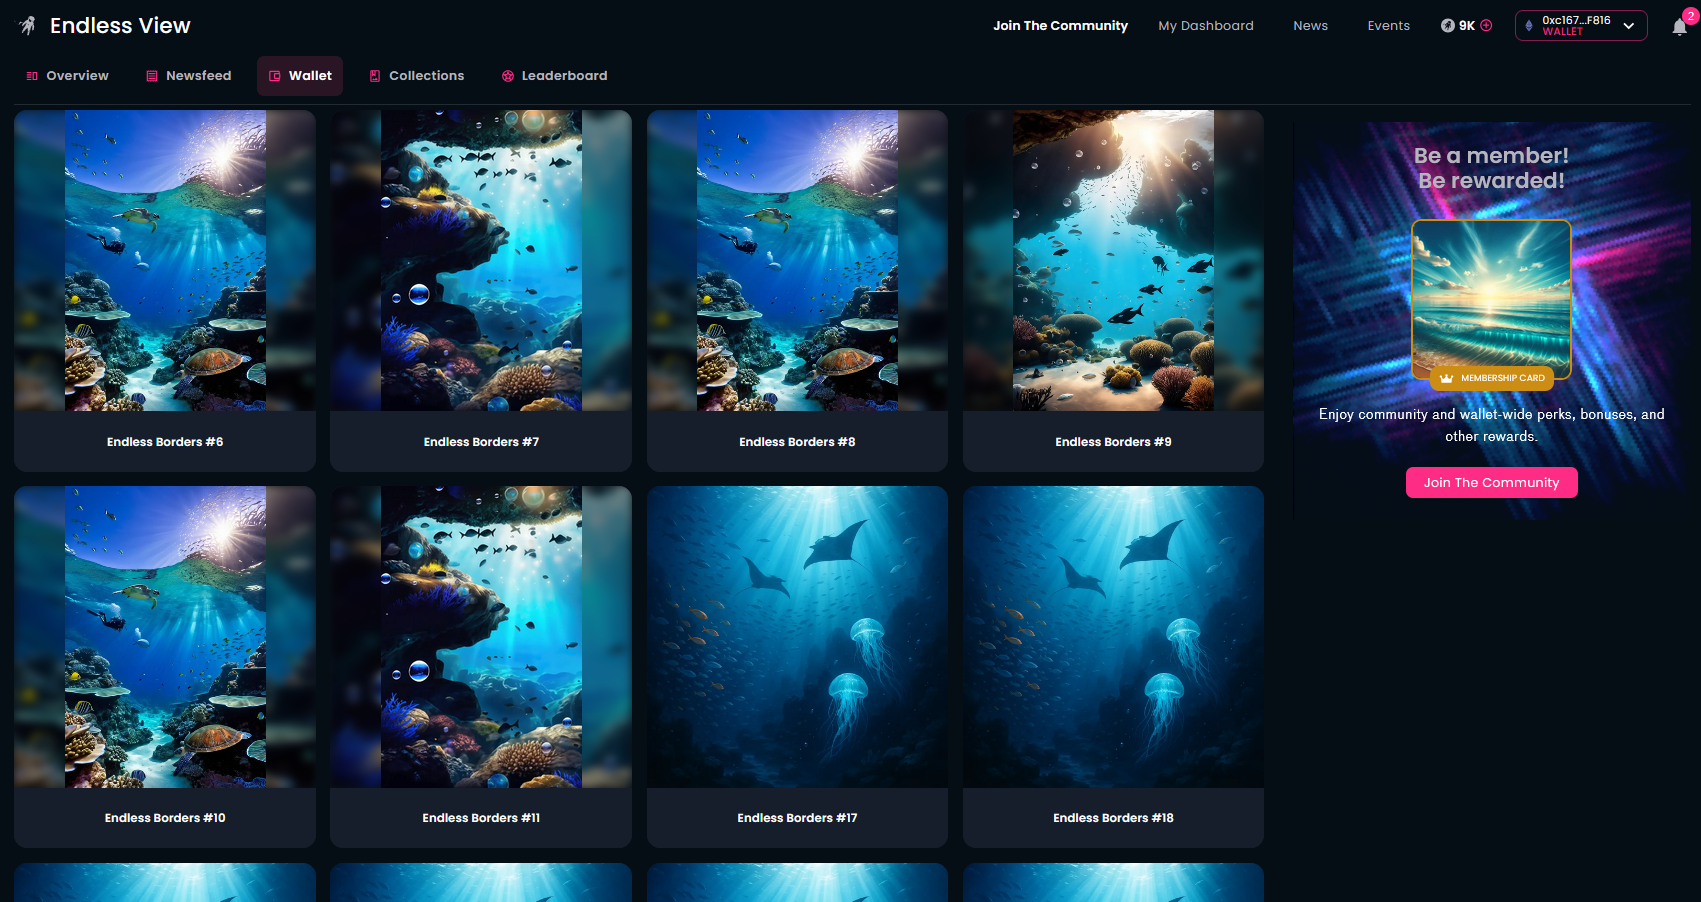
The community members now can see the unfolded cards on the communty page in the wallet.
-
However, if a community member purchase new cards from the collection after the first reveal, the new cards will appear unrevealed again.
-
Therefore, you, the community owner need to run another reveal process (of course when you wish). The reveal-related statistics can always be followed on the Reveal page of a given collection in the Mission Control.
